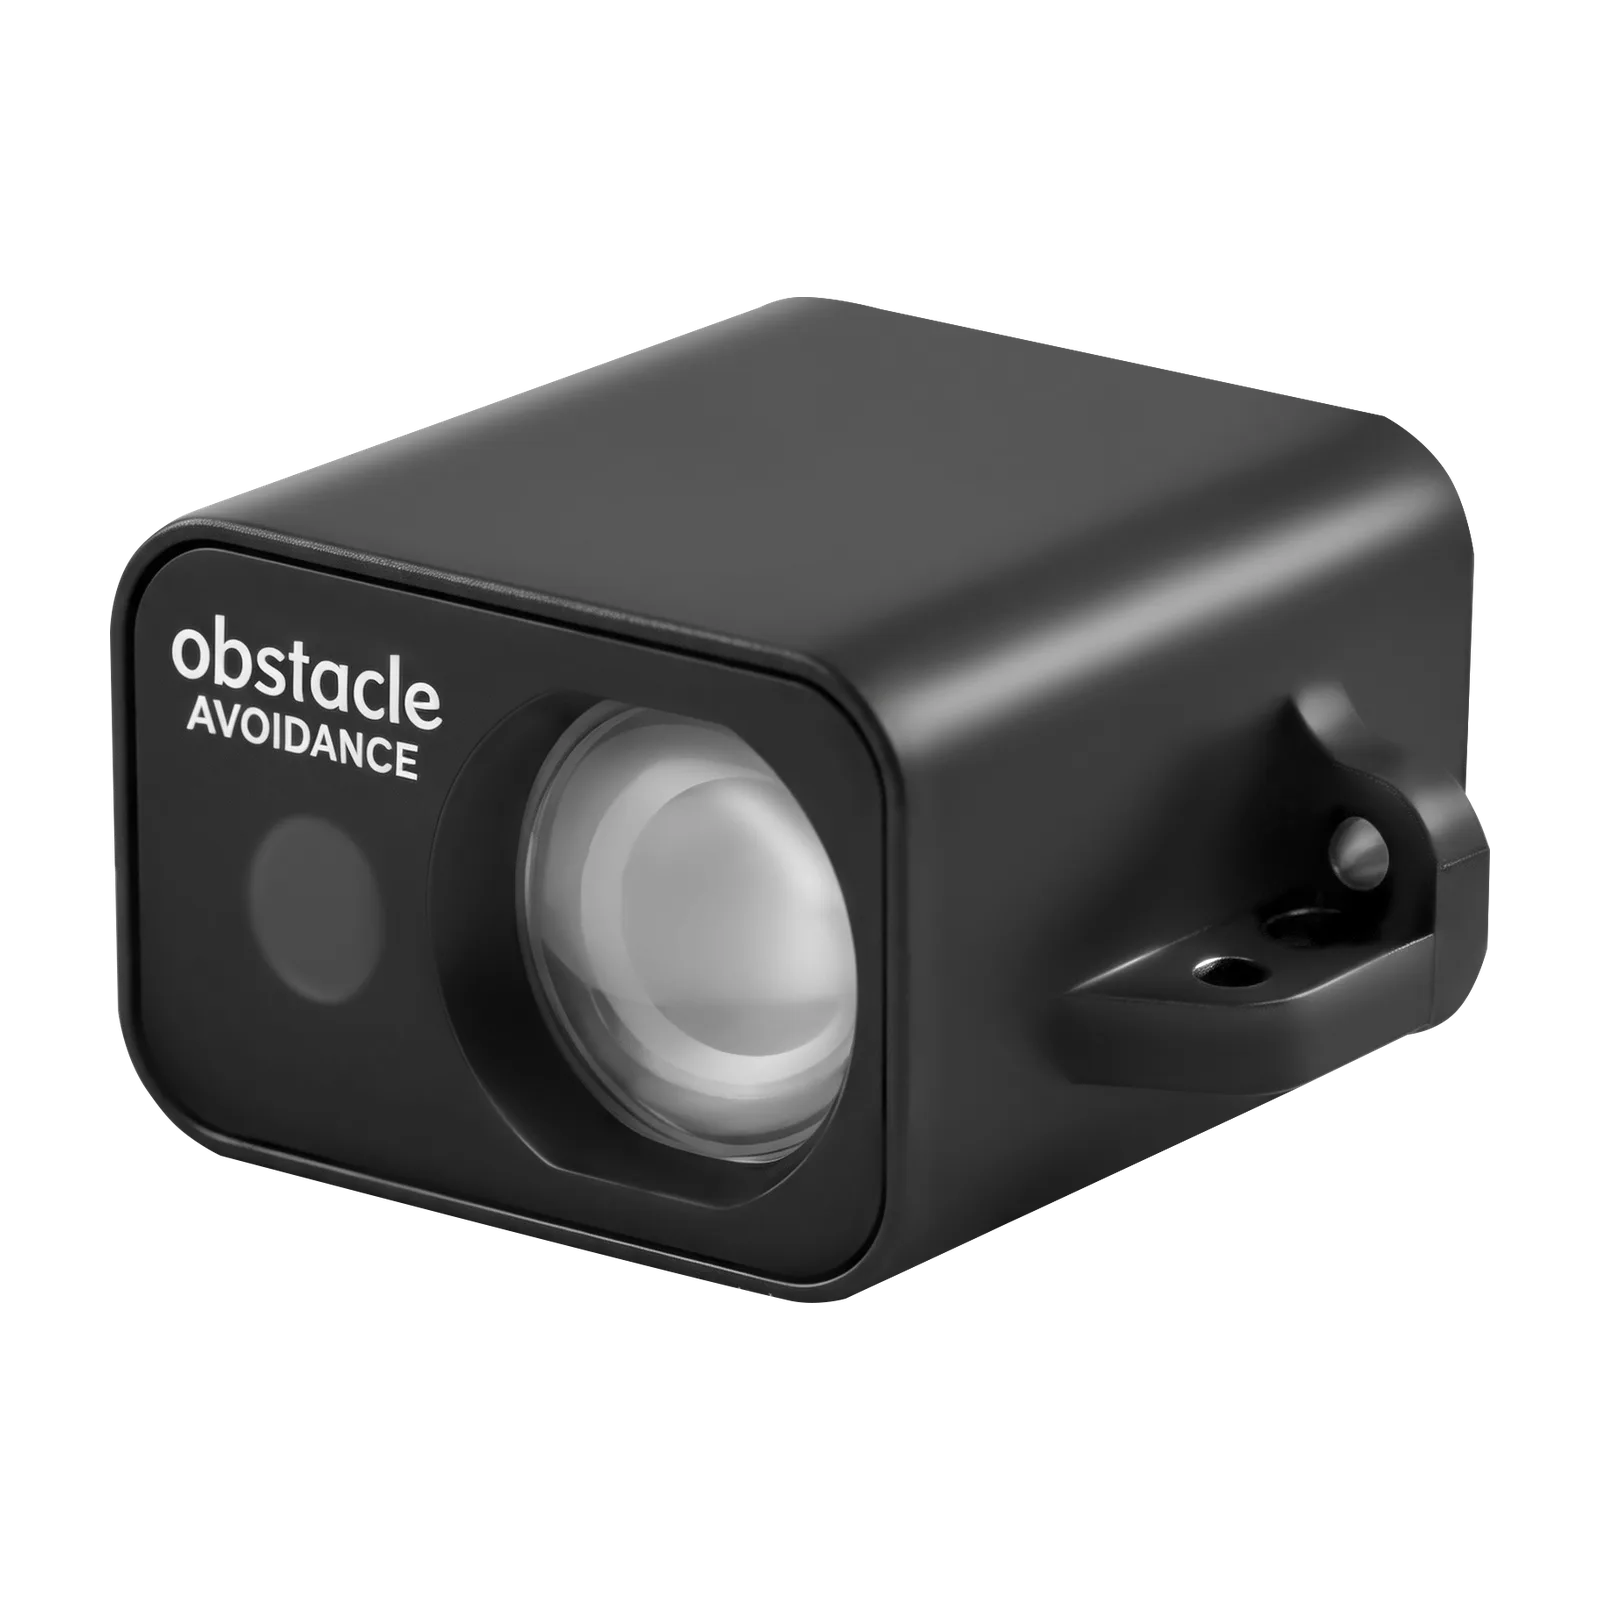
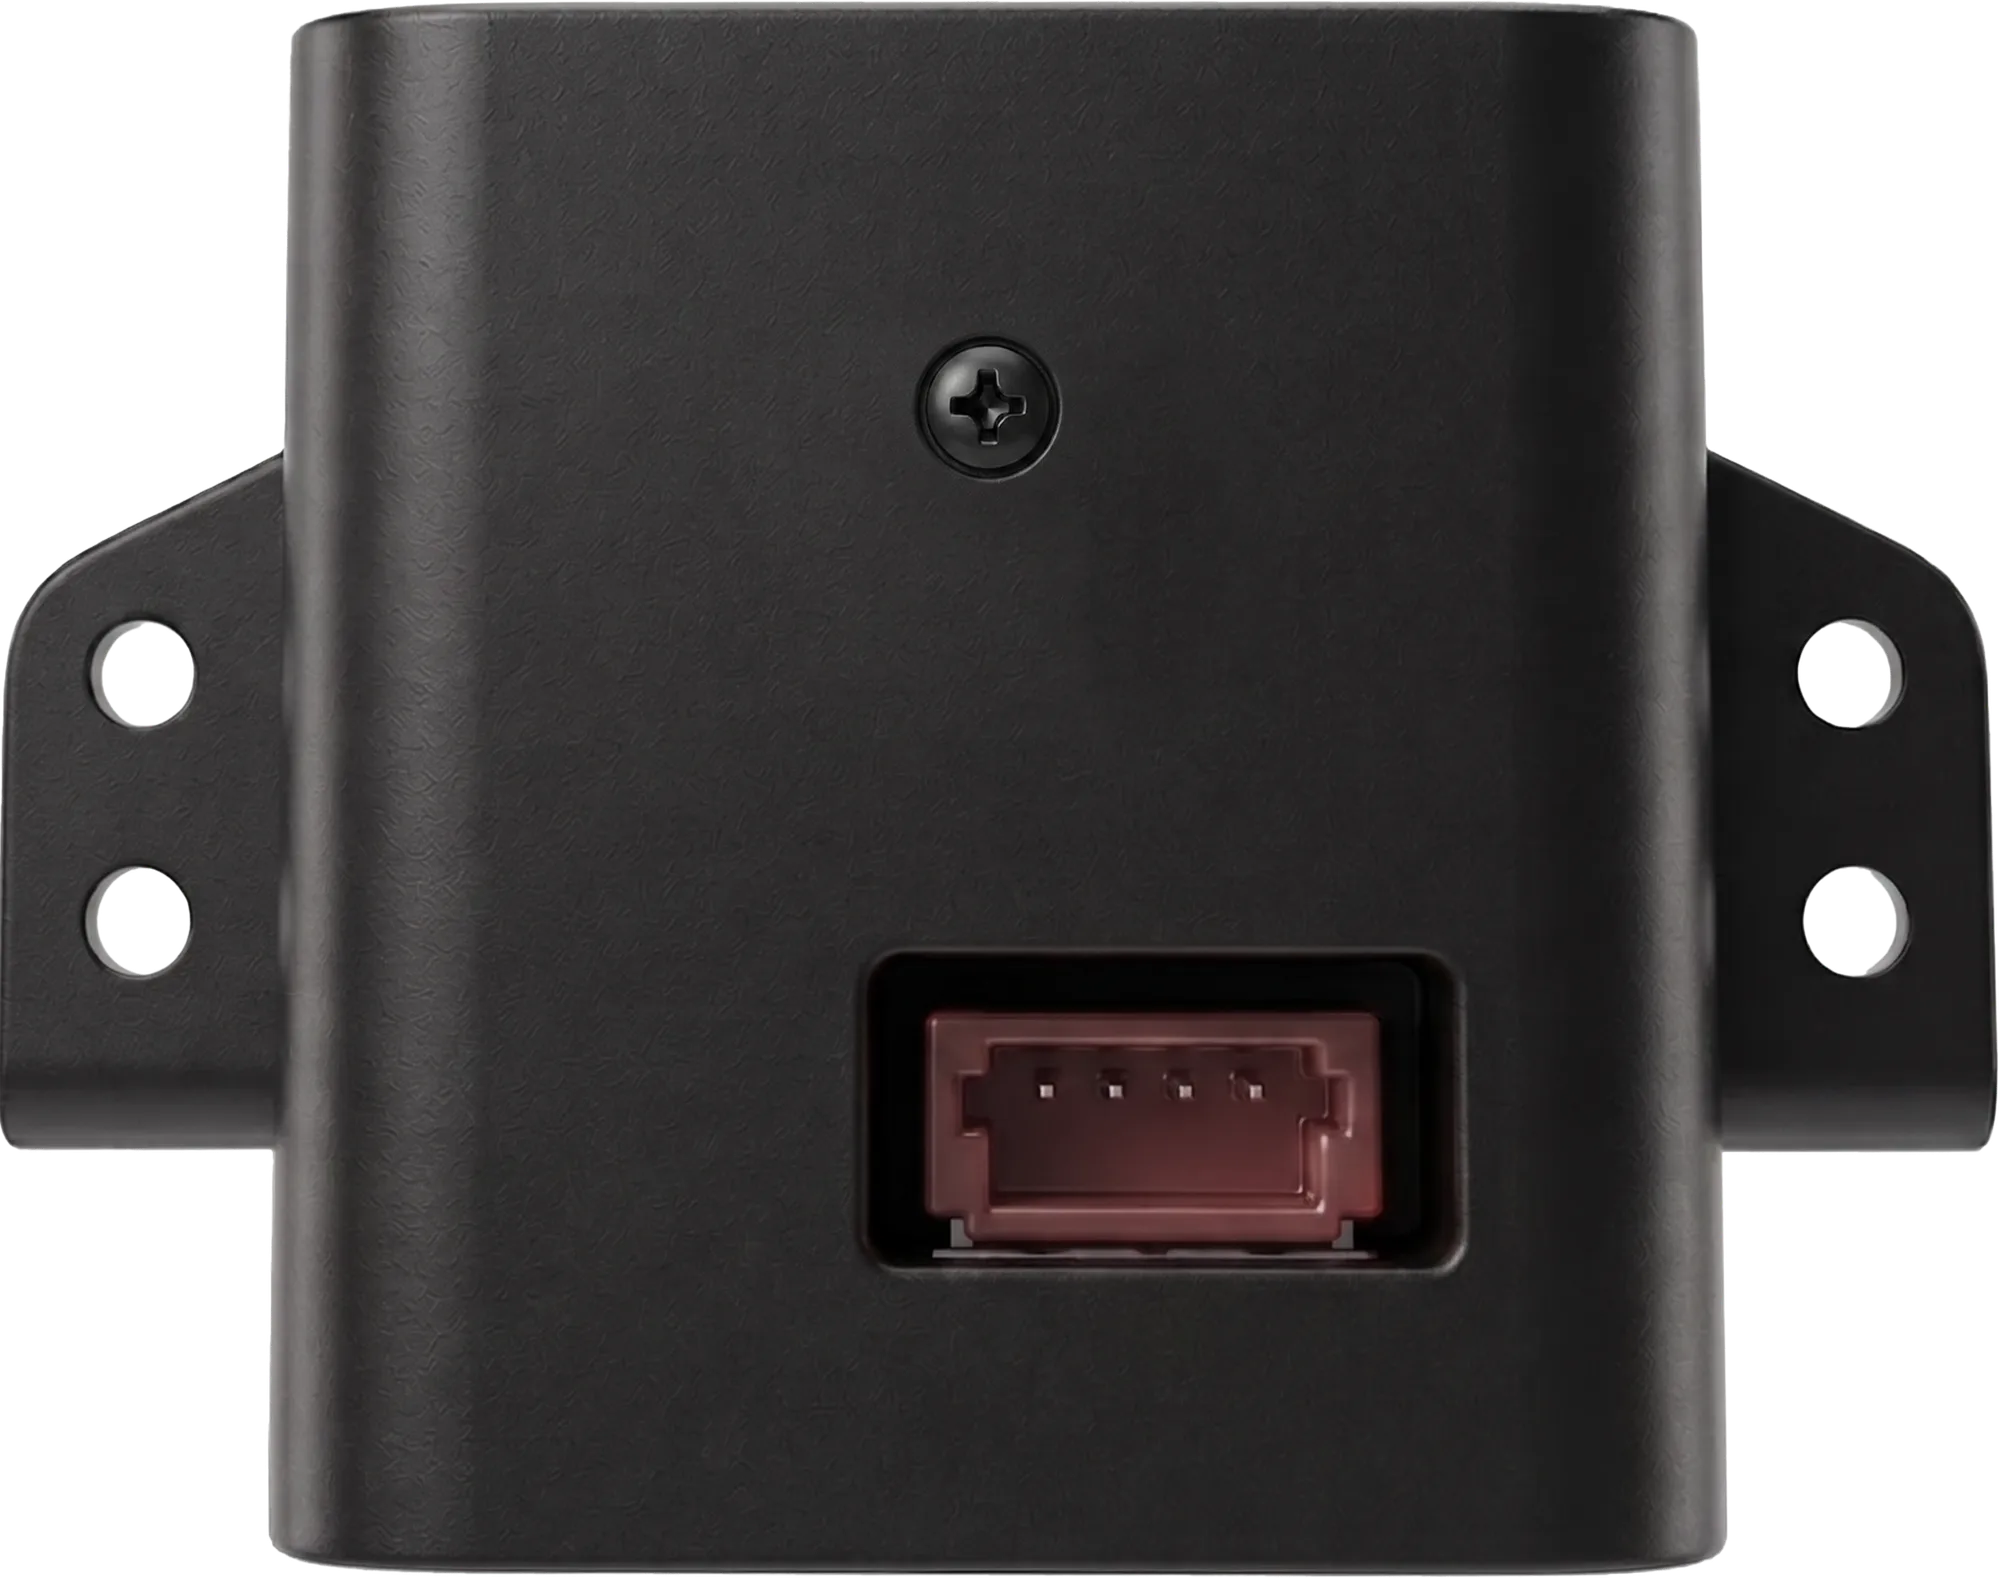
The CORVON CV50 is a long-range infrared ranging module built on the direct Time-of-Flight (dToF) principle. It measures up to 50 m with high accuracy, a 100 Hz measurement rate, a narrow <2° field of view, and a 905 nm light source. With a 5–10 cm dead zone and selectable UART or I²C output, it suits UAV altitude hold over varied terrain, long-range obstacle detection, and terrain mapping. Compatible with PX4, INAV and ArduPilot. The module measures 28.5 × 13.6 × 21.4 mm and weighs about 6.8 g.
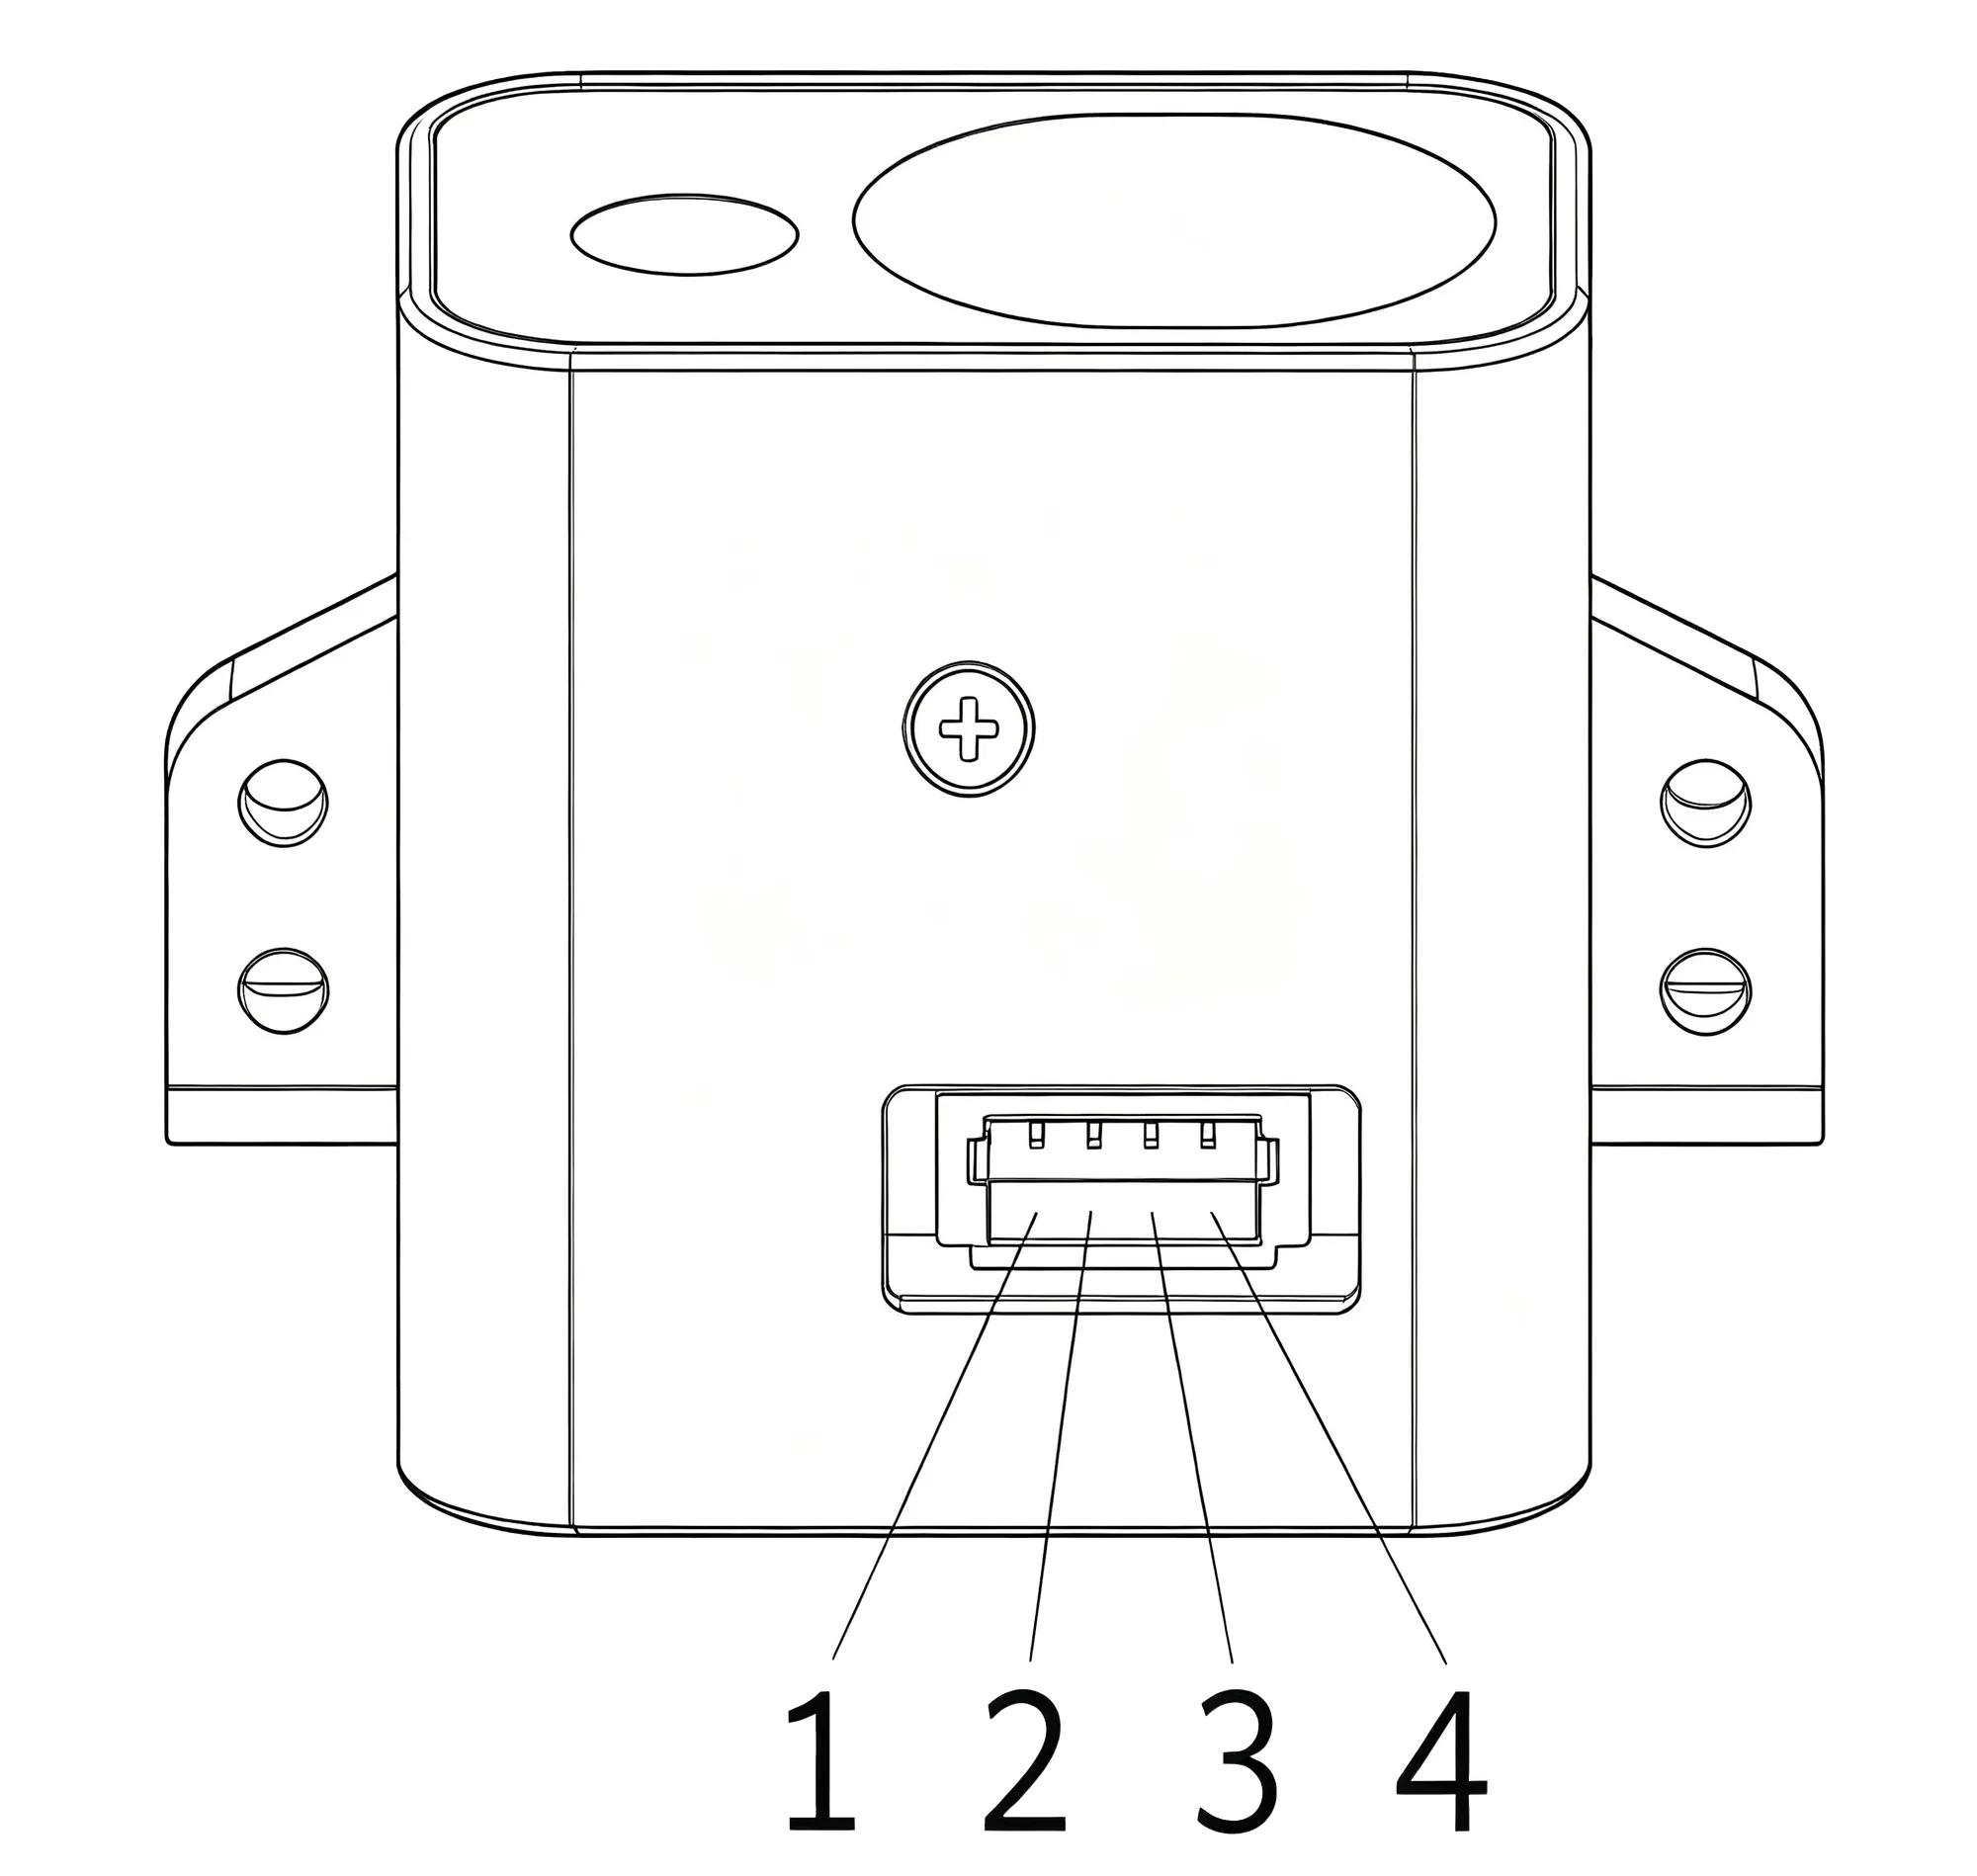
4-pin connector, UART / I²C selectable. For UART connect module TX to the flight-controller RX and module RX to the flight-controller TX (115200 bps).
Pin
UART
I²C
Function
1
GND
GND
Ground
2
VCC
VCC
Power · +5 V
3
RX
SDA
UART receive / I²C data
4
TX
SCL
UART transmit / I²C clock
05/Output Protocol
UART Output Protocol
S/N
Name
Content
Description
1
Header
0xDF
2
Device ID
0x32
3
System ID
0x00
4
Message ID
0x40
5
Packet Sequence
0x00~0xFF
6
Payload Length
0x04
7
Payload Content
TOF Distance Low Byte
TOF Distance (mm)
8
TOF Distance High Byte
9
TOF Signal Strength Low Byte
10
TOF Signal Strength High Byte
11
Checksum
0xXX
Sum of all preceding bytes
I2C Output Protocol(The I2C output protocol is proprietary and does not support open-source use.)
Device Address: 0x51 (7-bit address)
S/N
Register Address
Content
Description
1
0x00
Device ID
0x32
2
0x01
TOF Distance Low Byte
TOF Distance (mm)
3
0x02
TOF Distance High Byte
4
0x03
TOF Signal Strength Low Byte
5
0x04
TOF Signal Strength High Byte
06/Ground Station Configuration Guide
I. PX4 Configuration
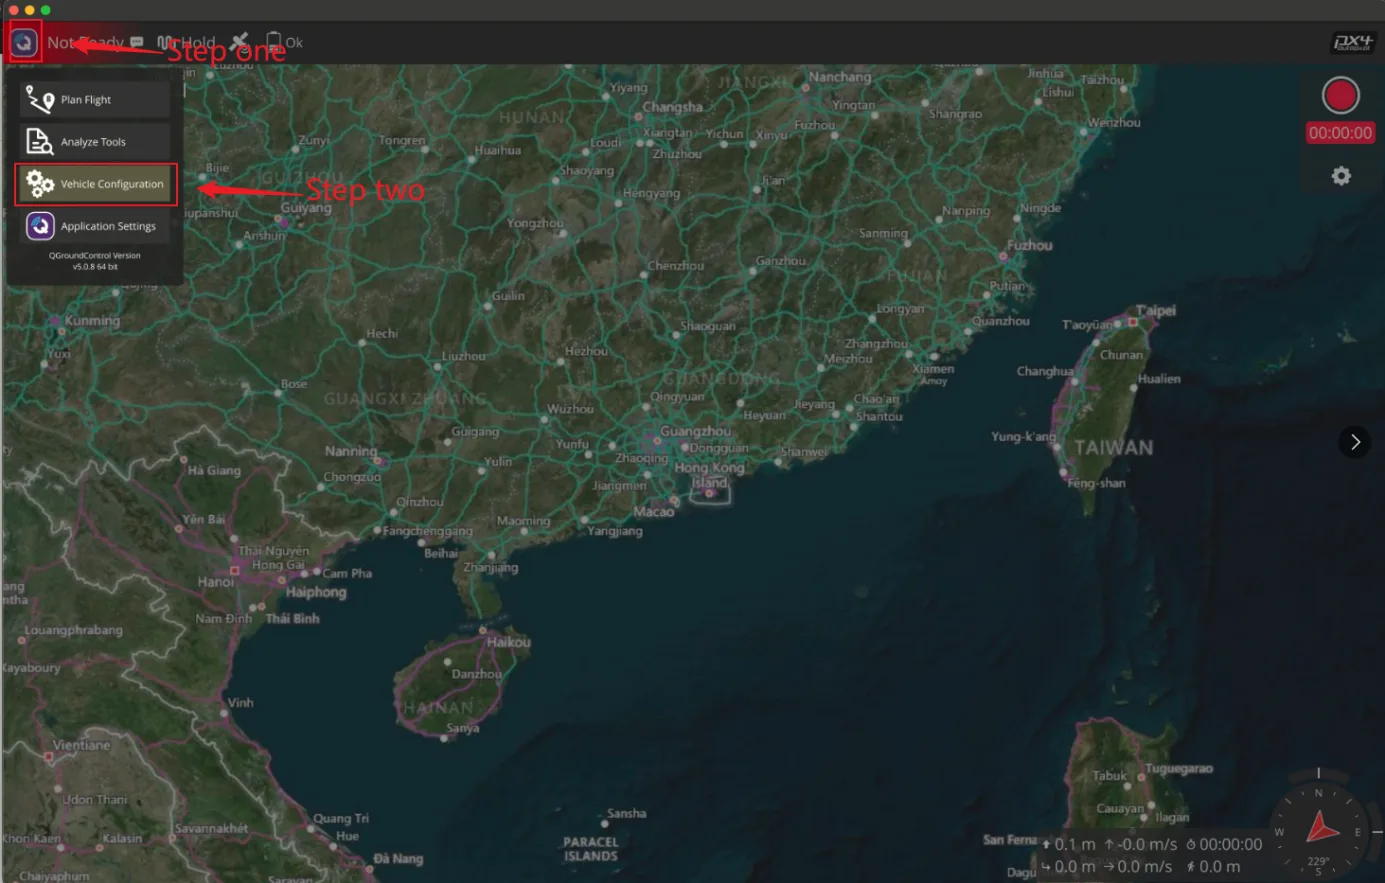
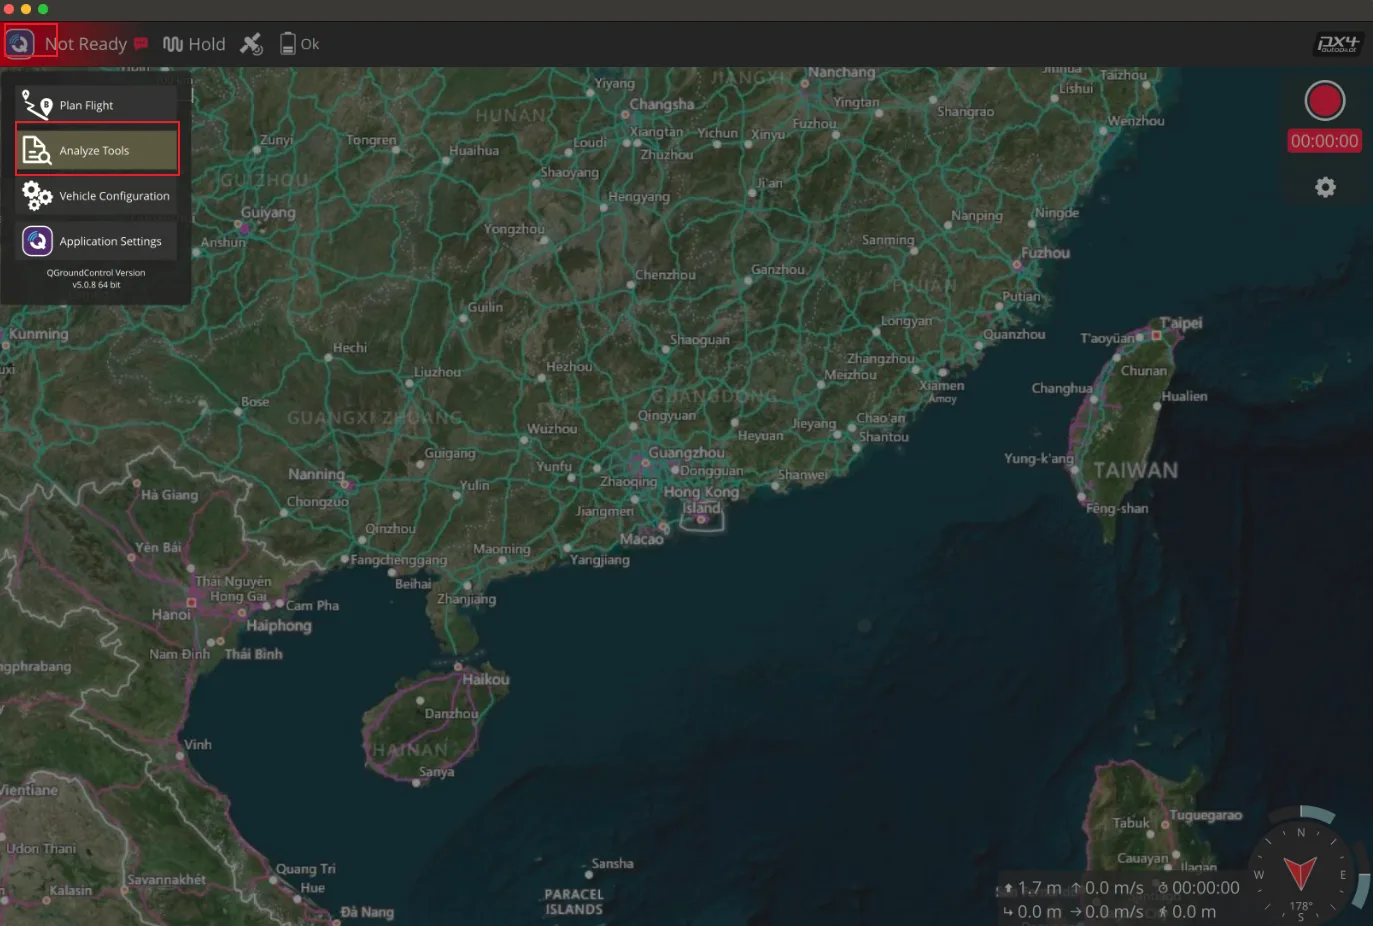
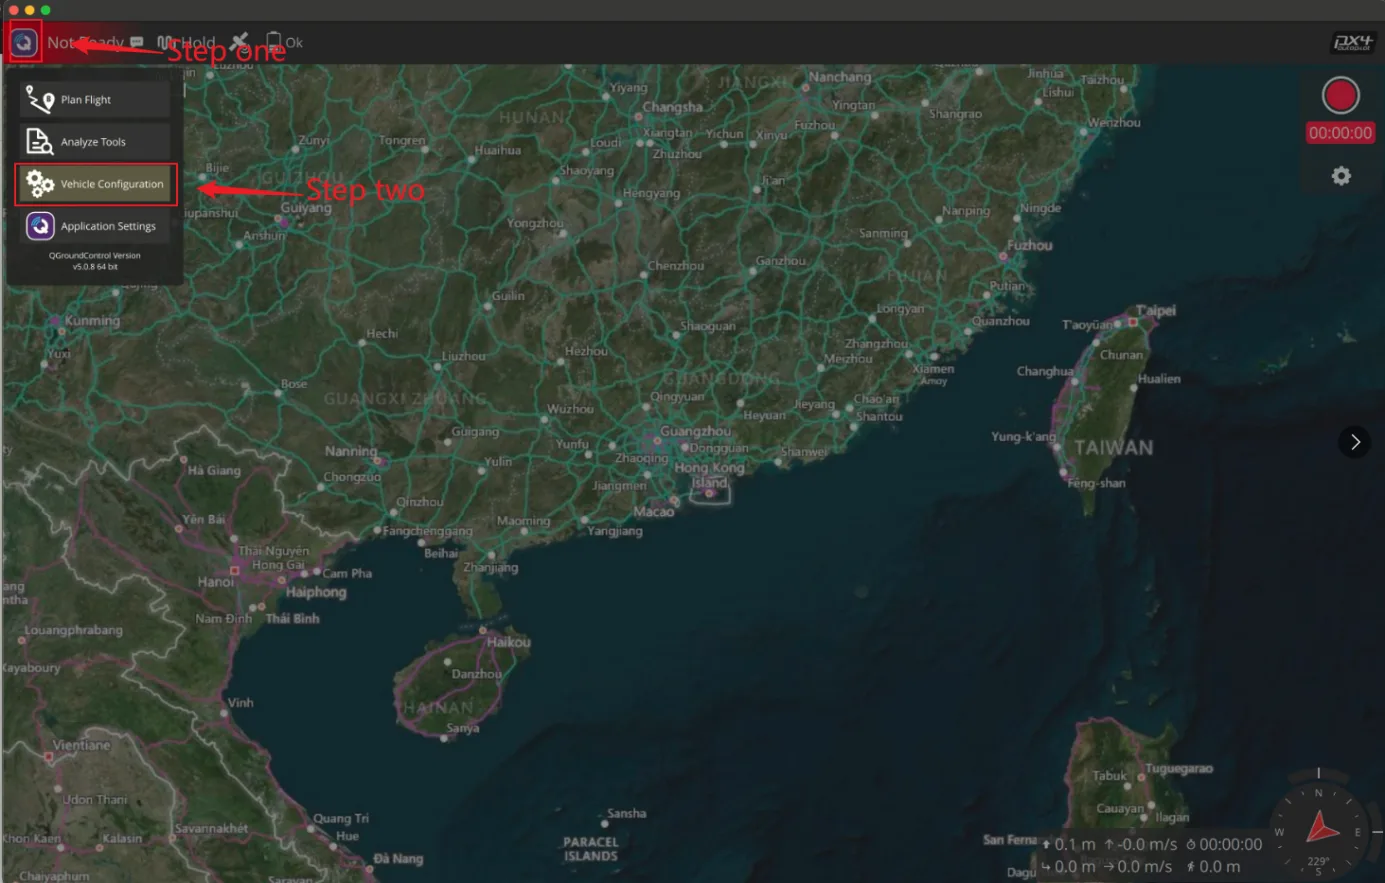
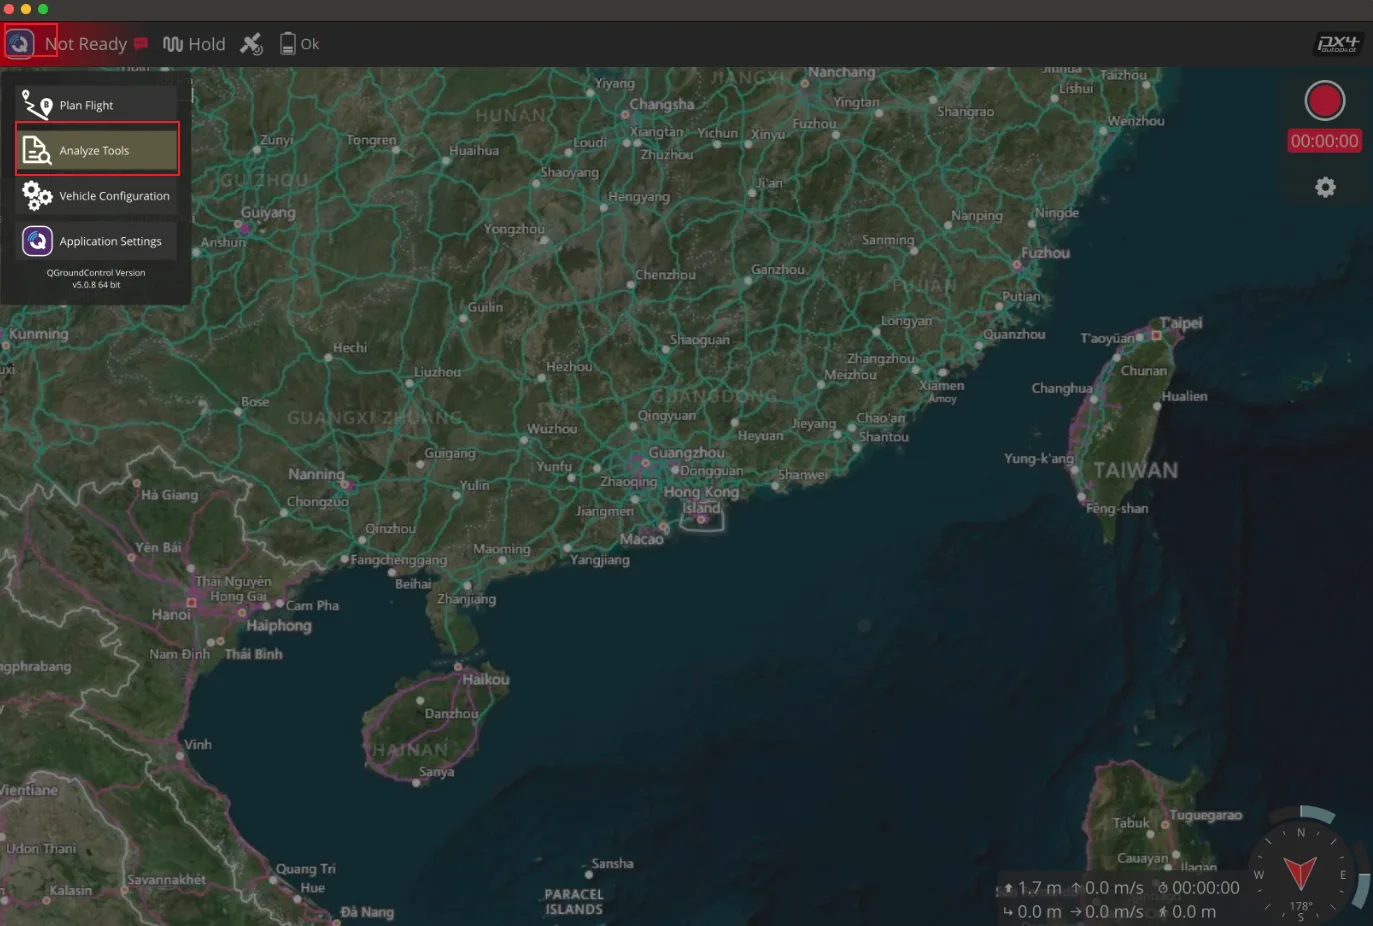
1. Open the tool and select Vehicle Configuration;
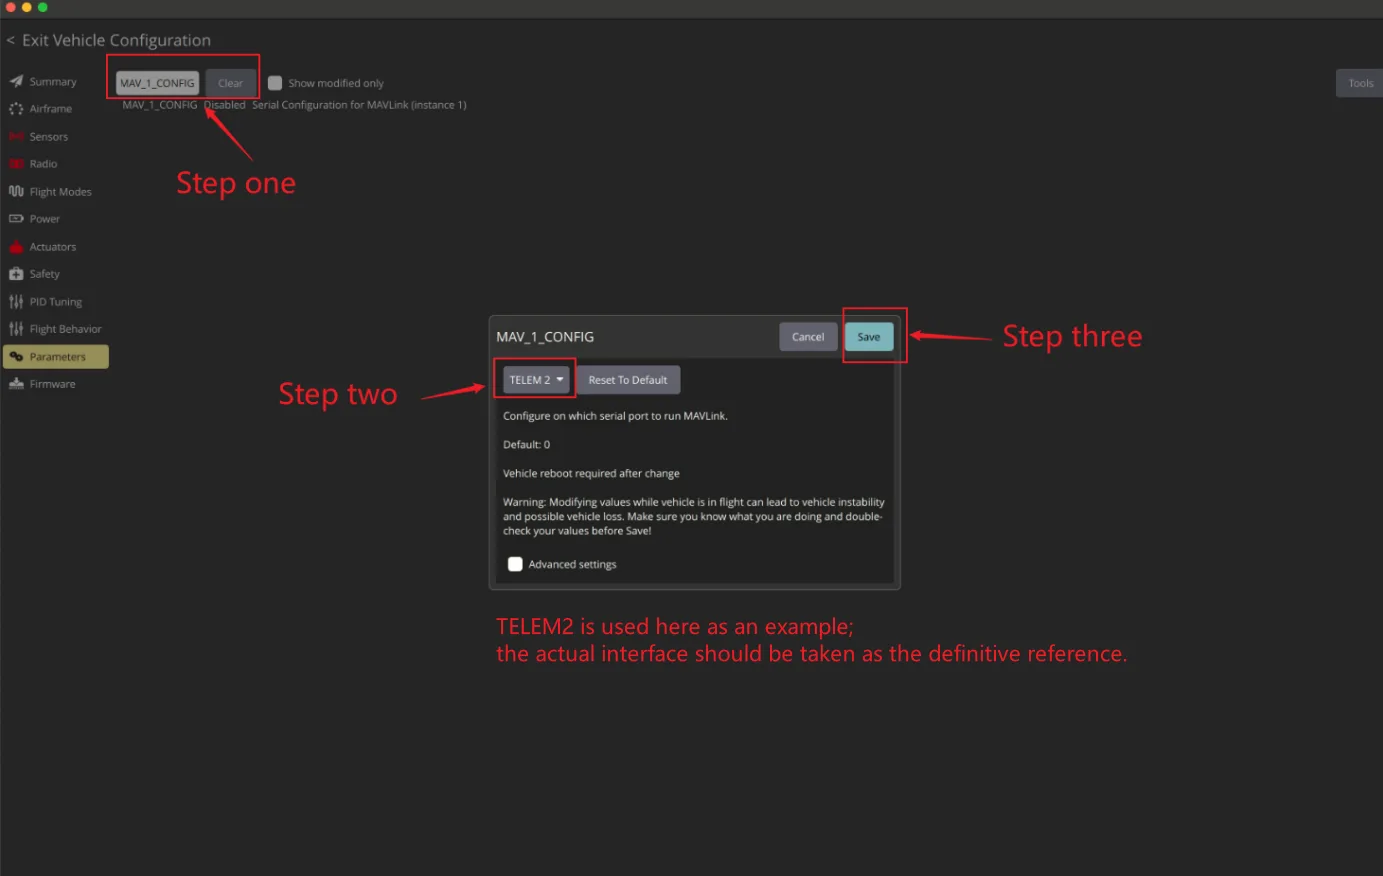
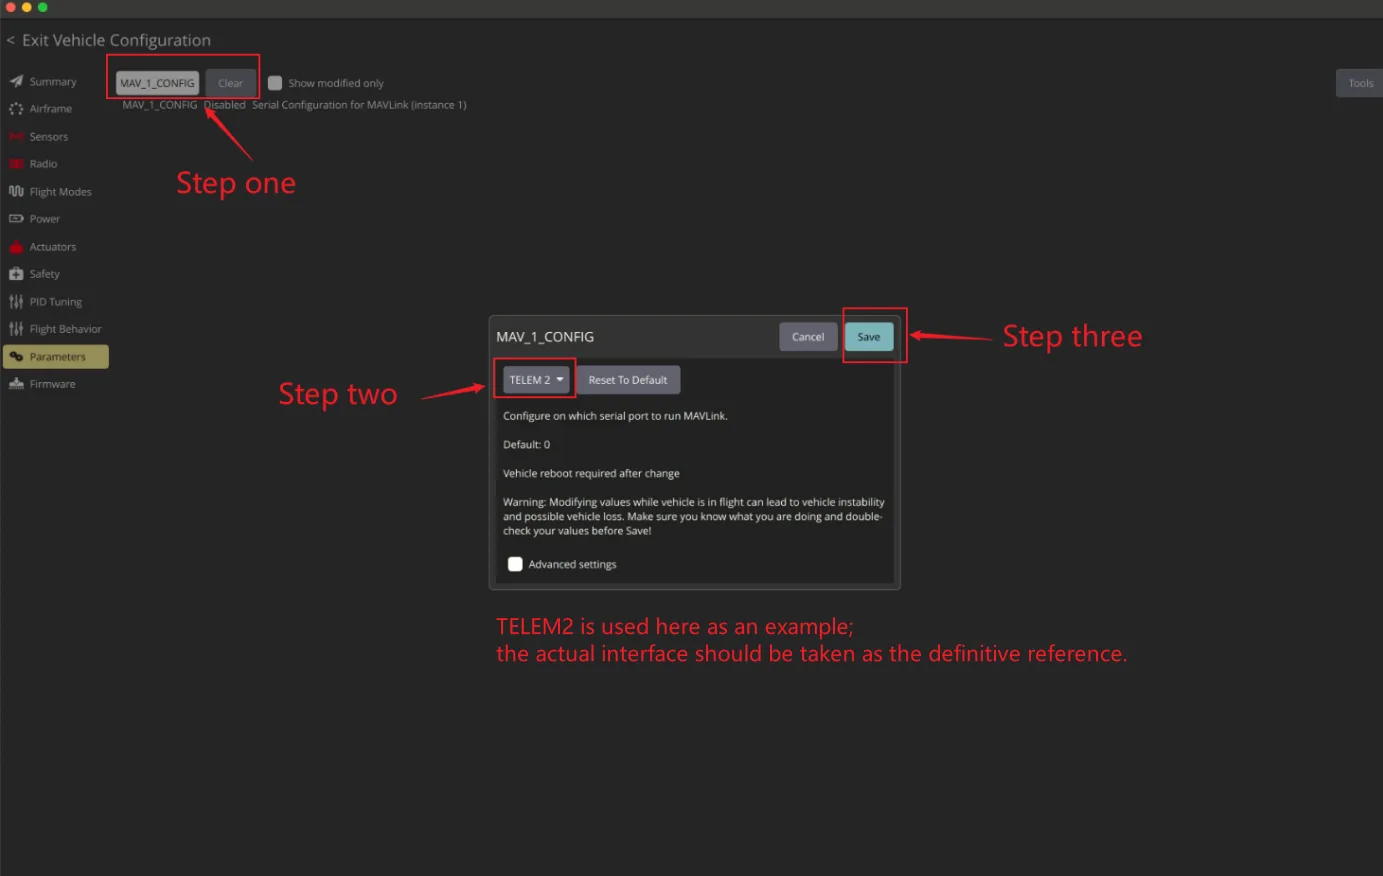
2. Set MAV_1_CONFIG to TELEM 2 and save;
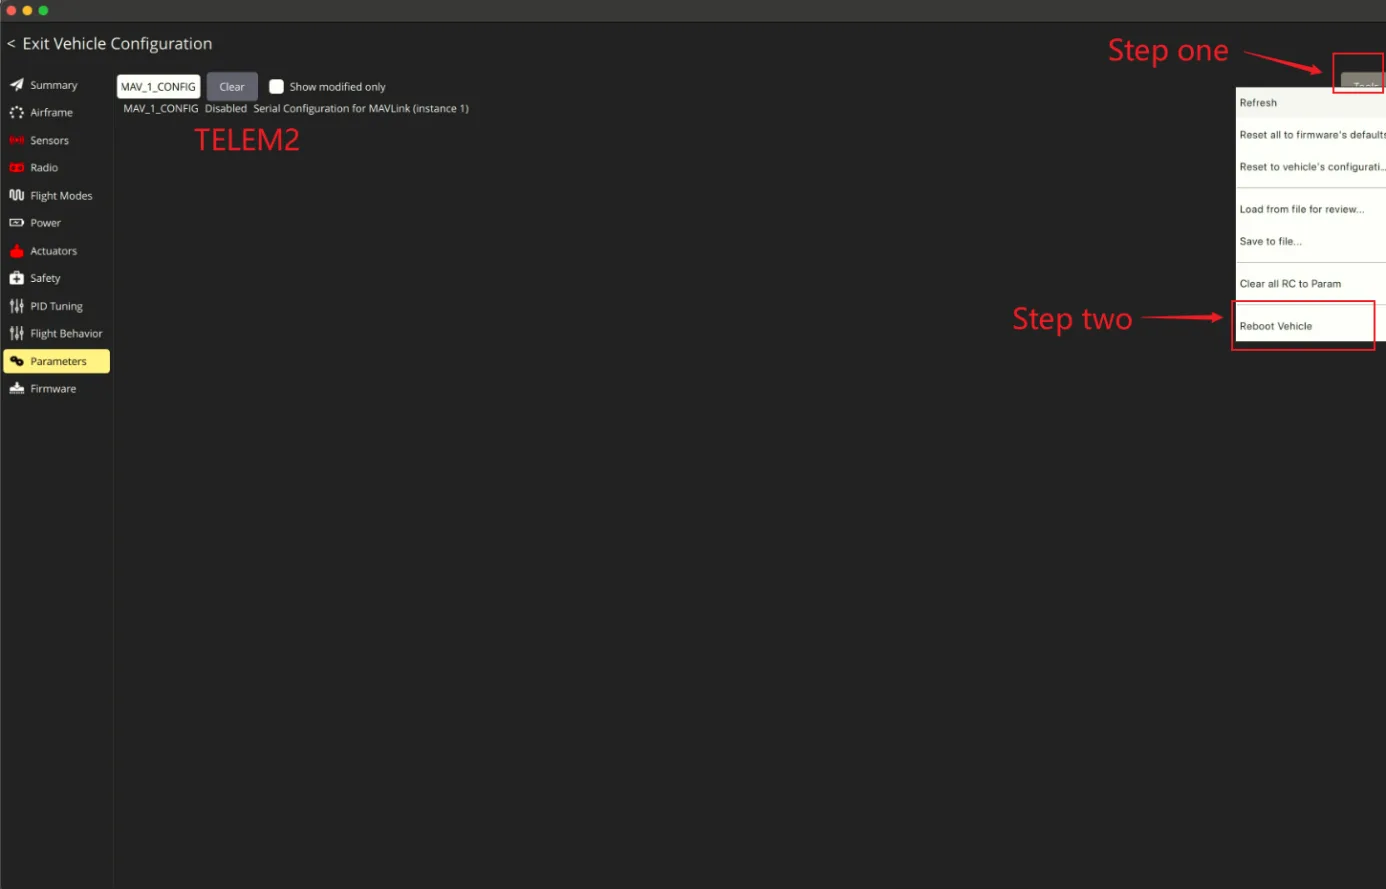
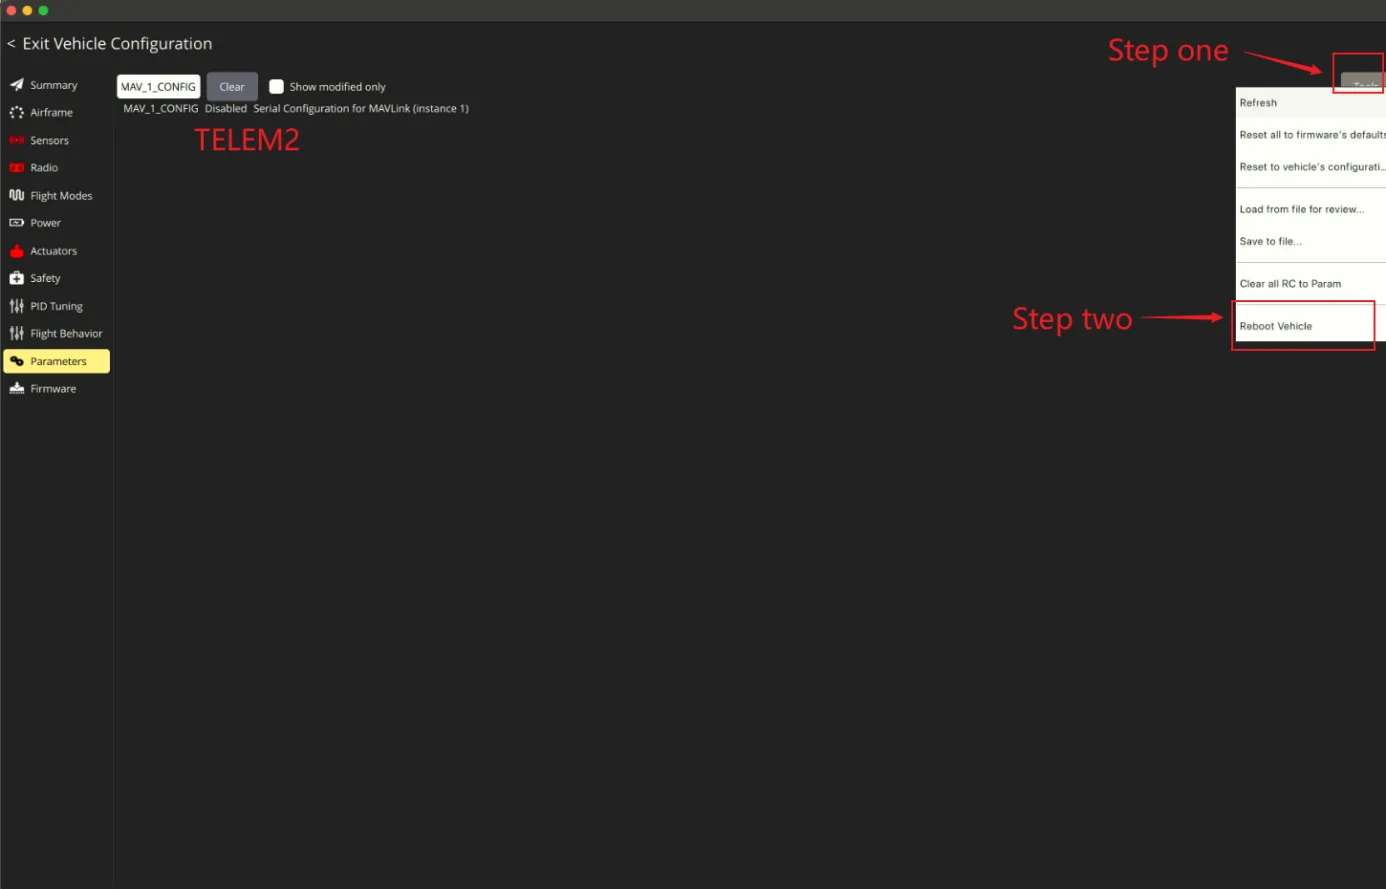
3. Click “Tools”, then click “Reboot Vehicle”;
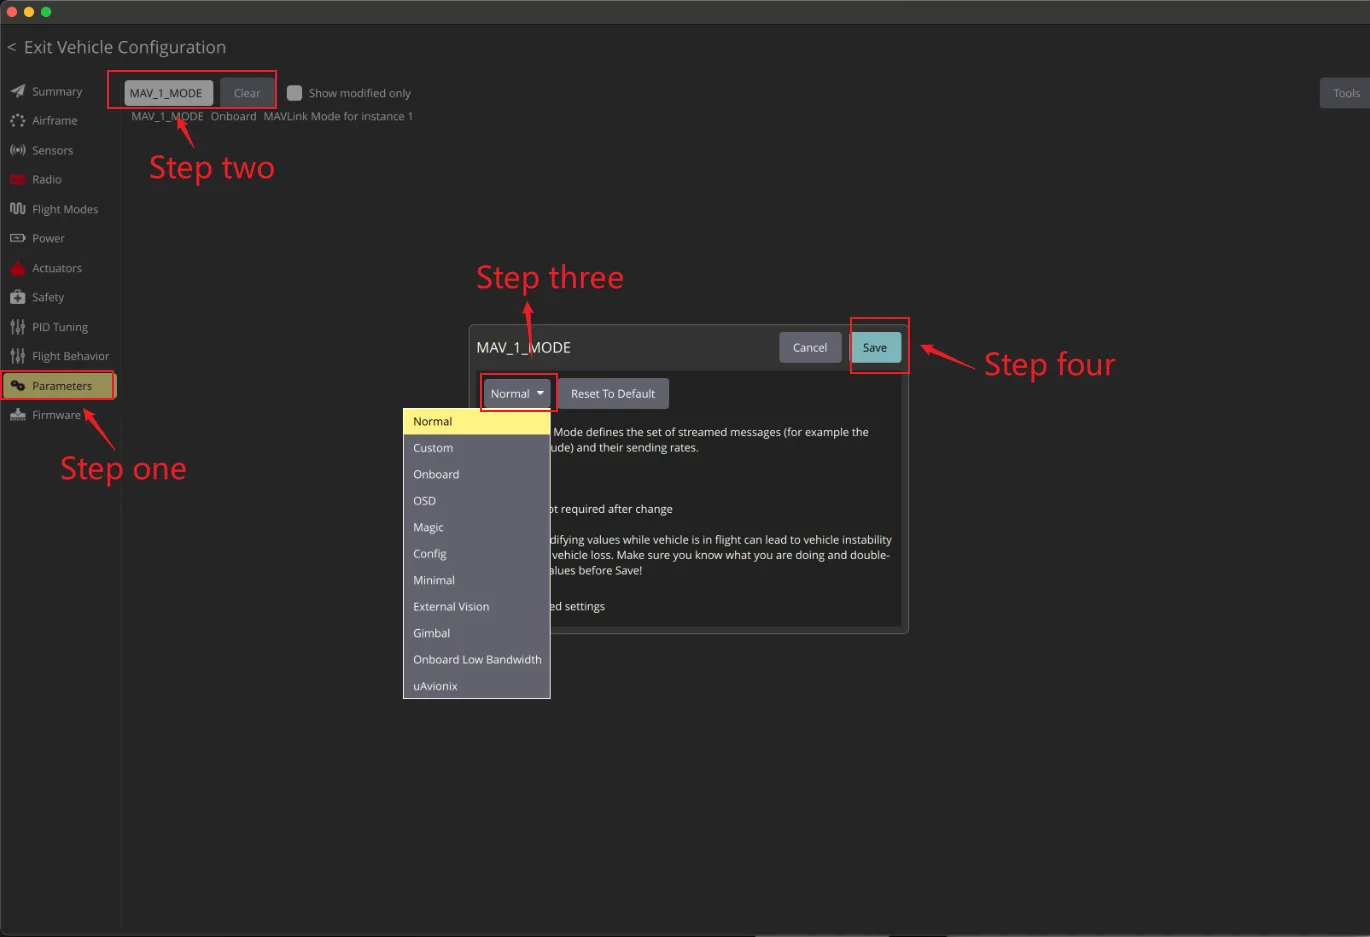
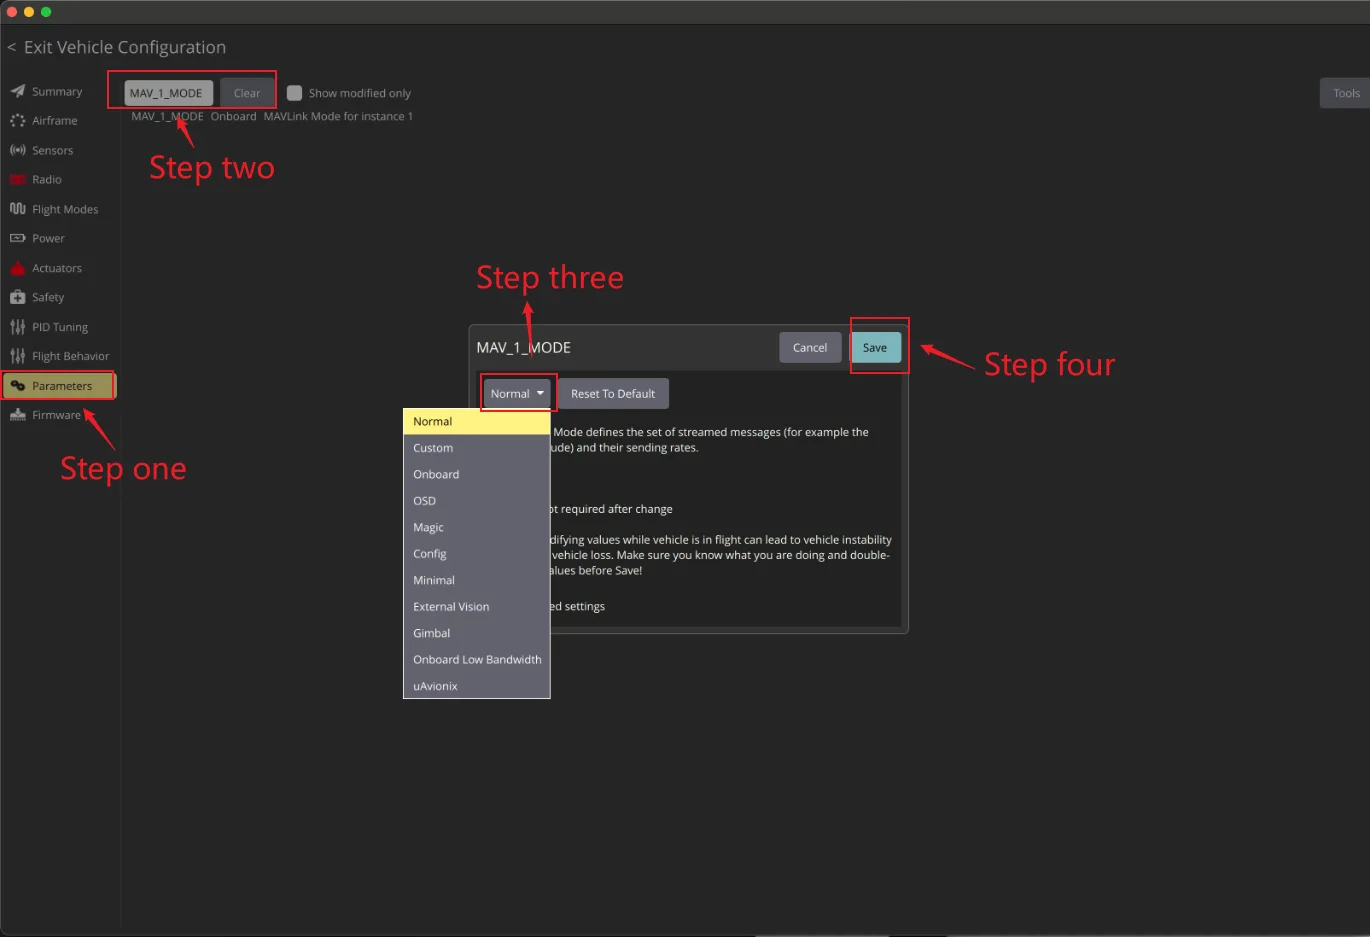
4. Set MAV_1_MODE to Normal and save;
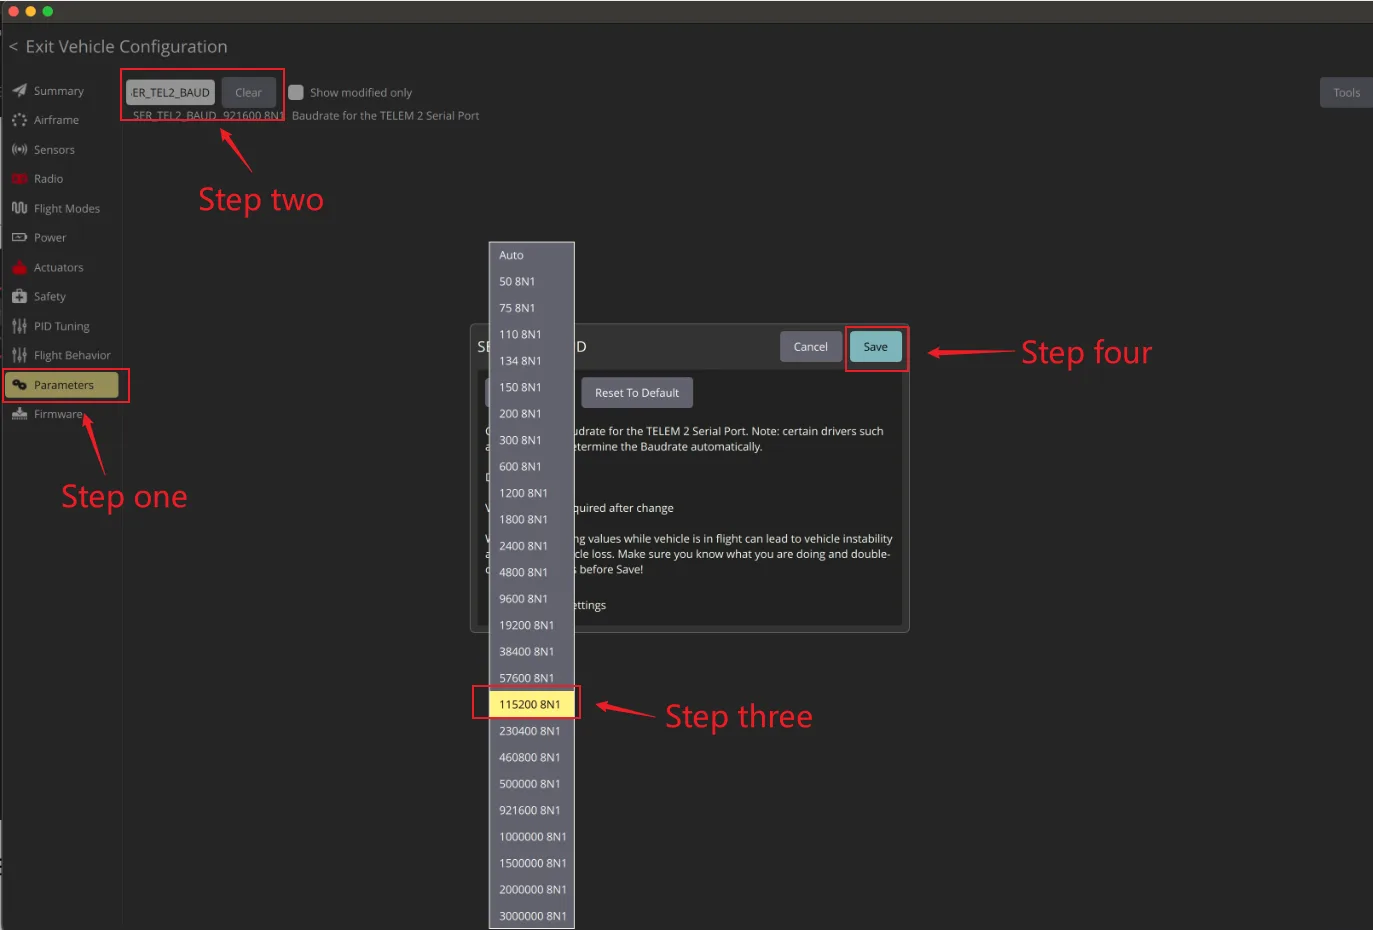
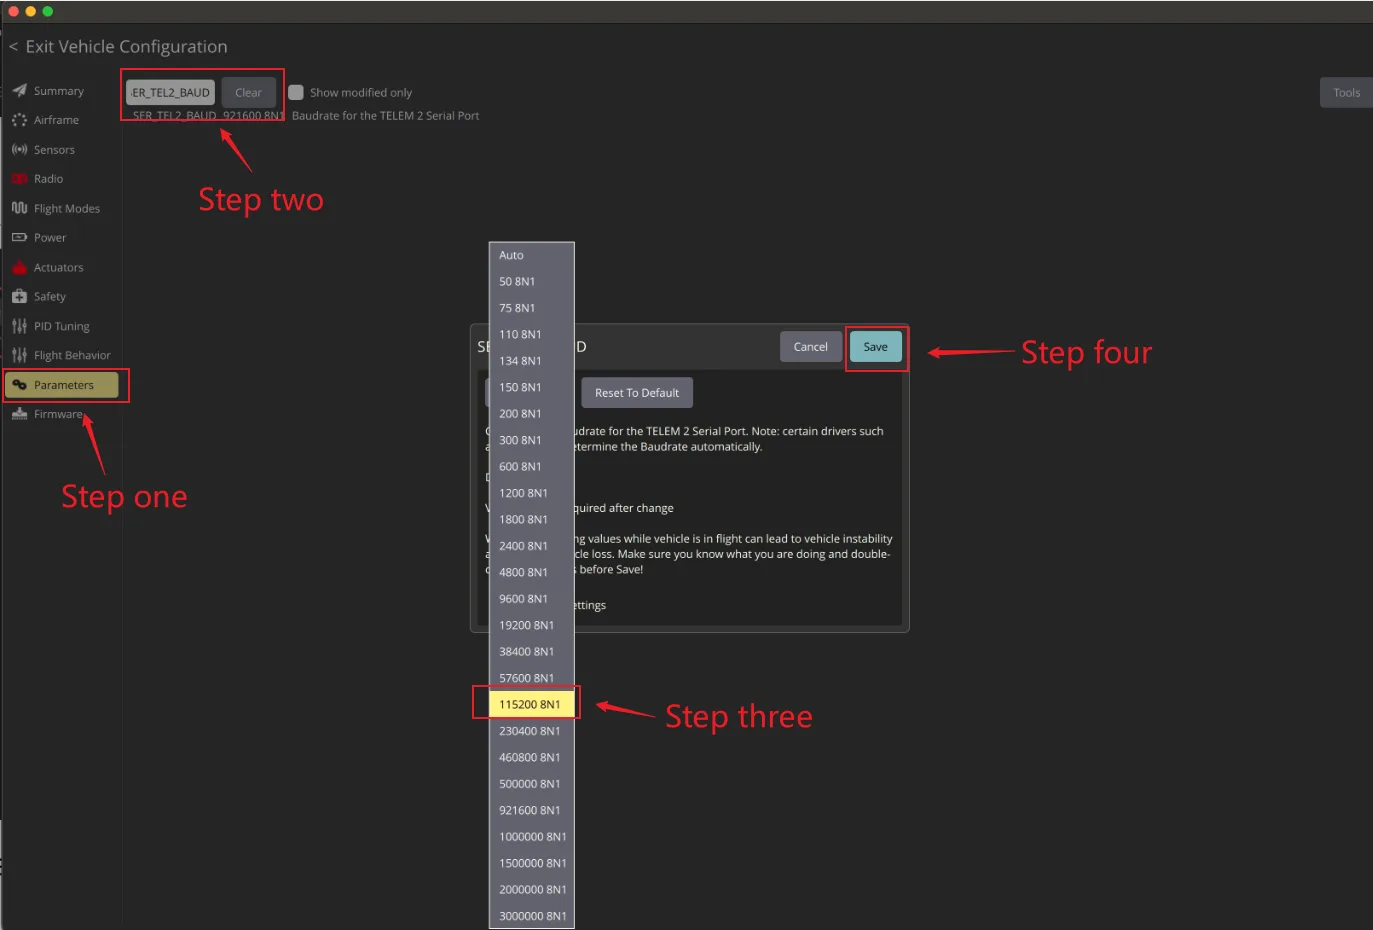
5. Set SER_TEL2_BAUD to 115200 8N1 and save.
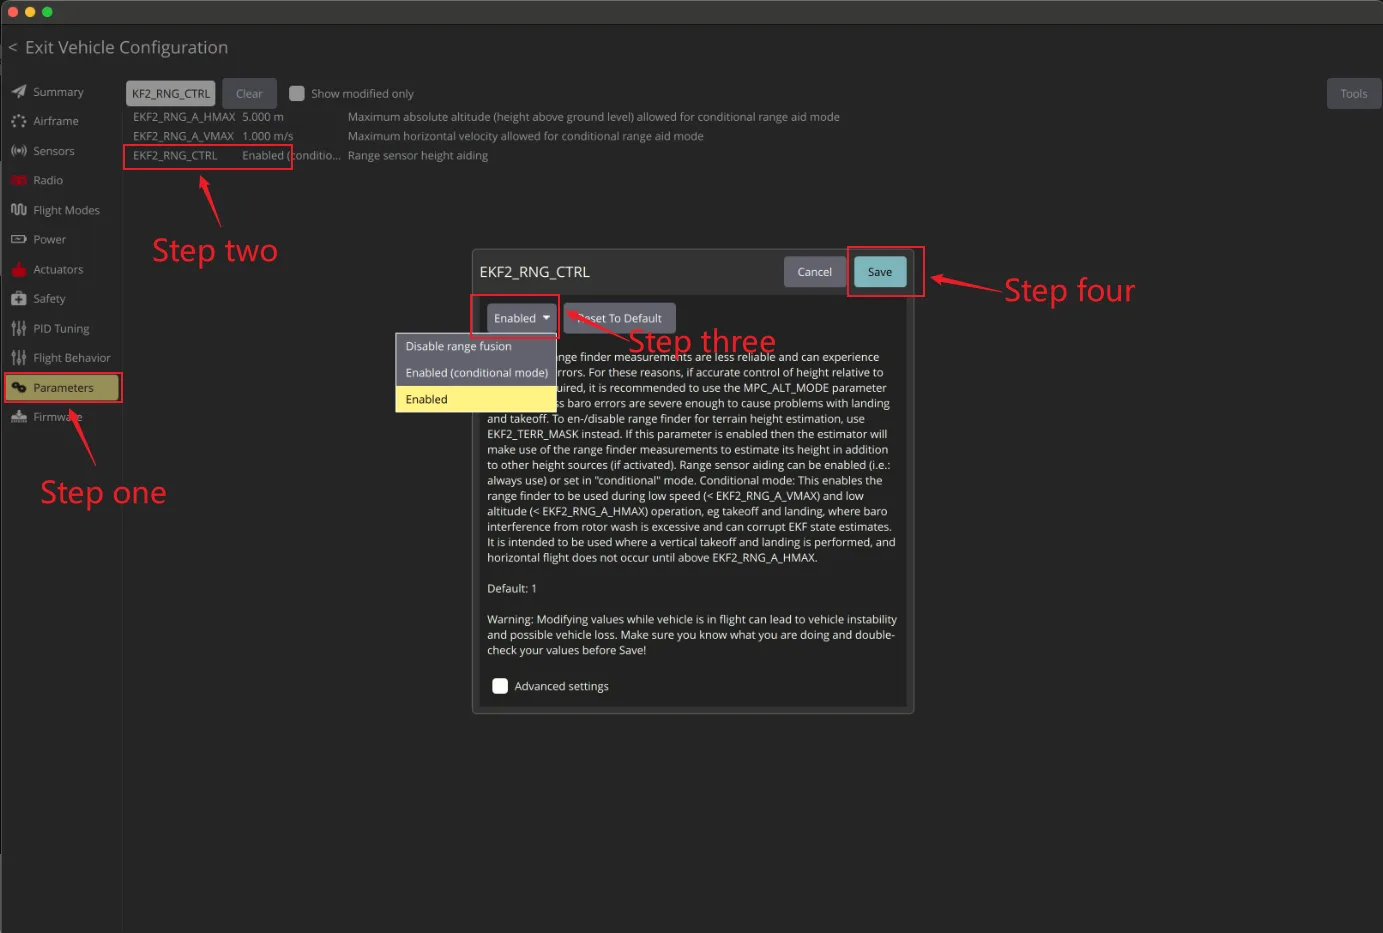
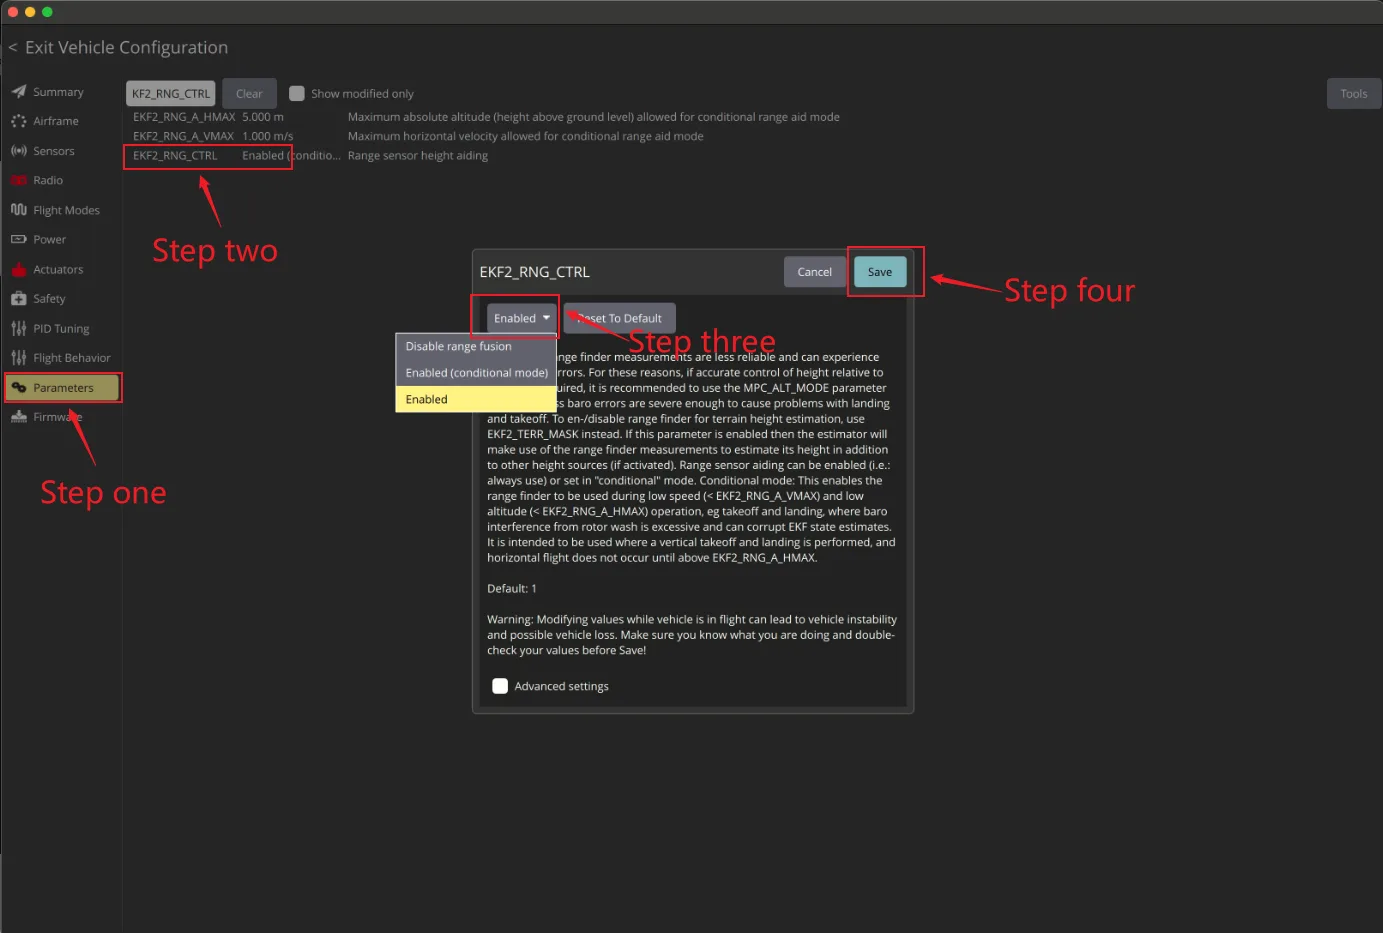
6. Set EKF2_RNG_CTRL to Enabled and save;
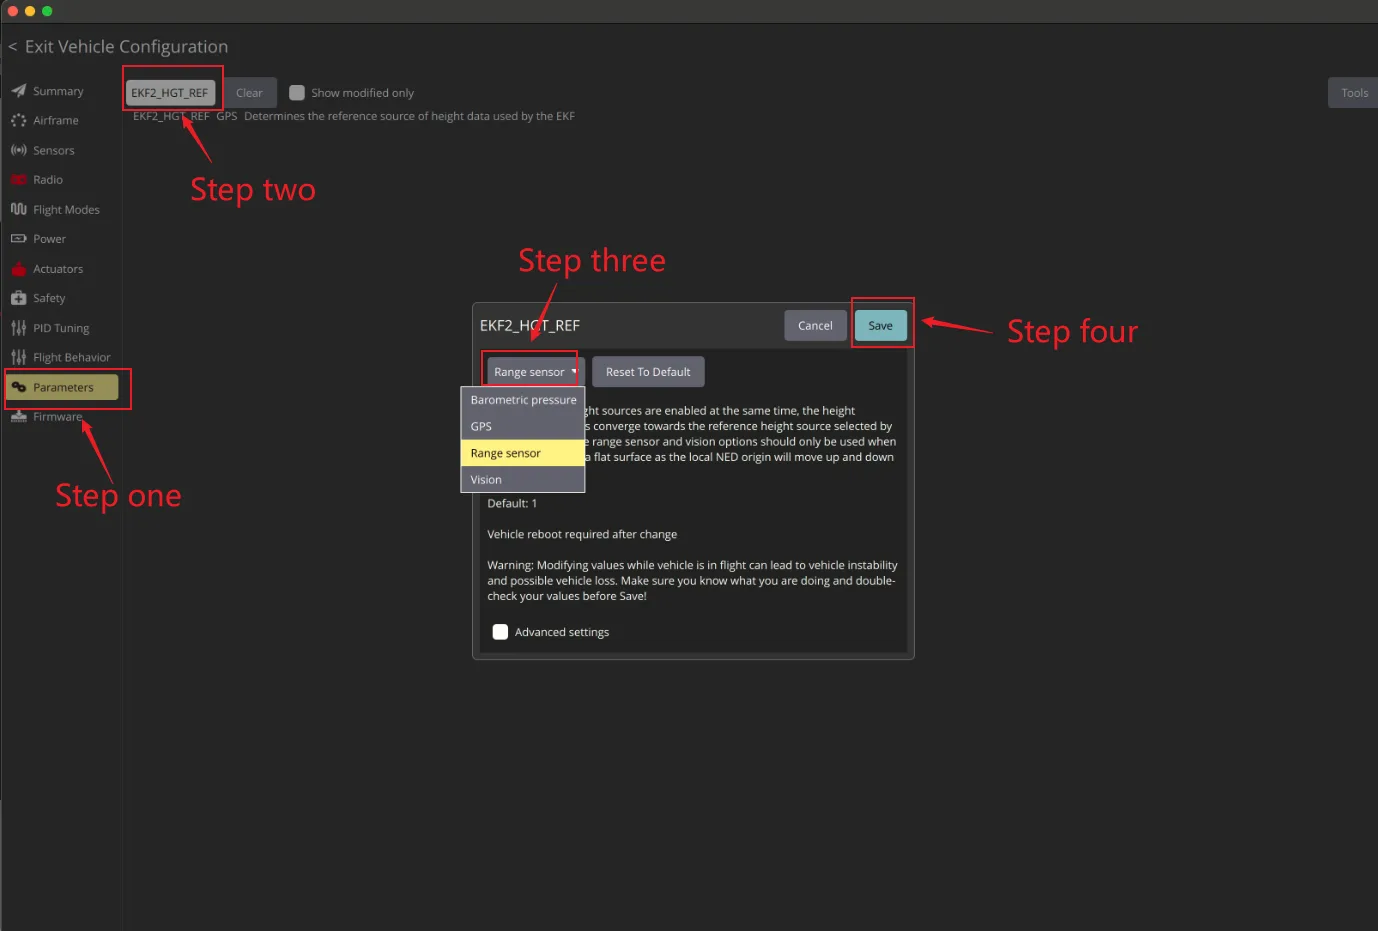
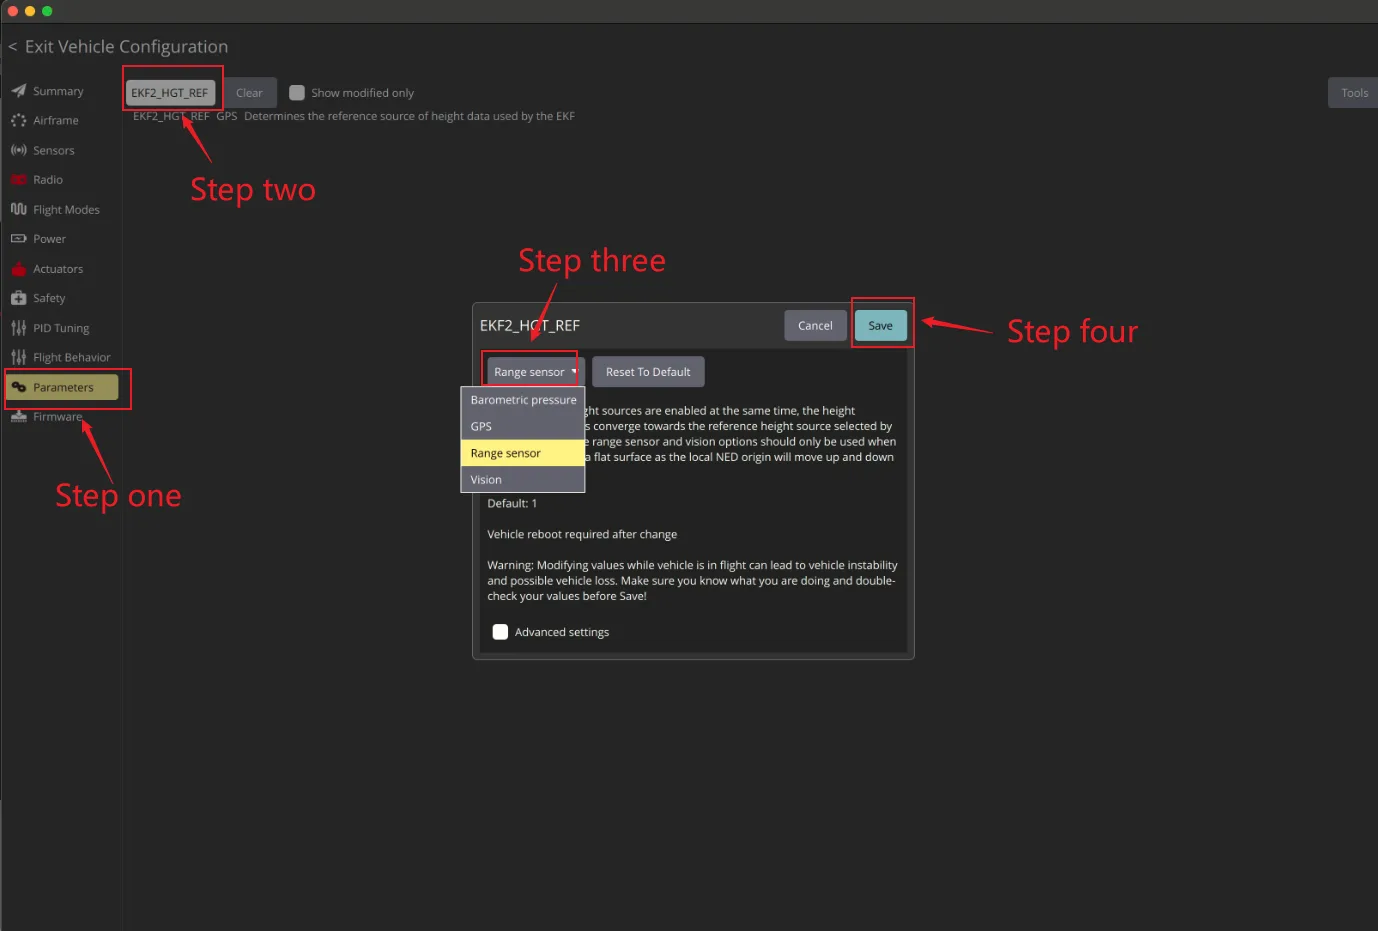
7. Set EKF2_HGT_REF to Range sensor and save;
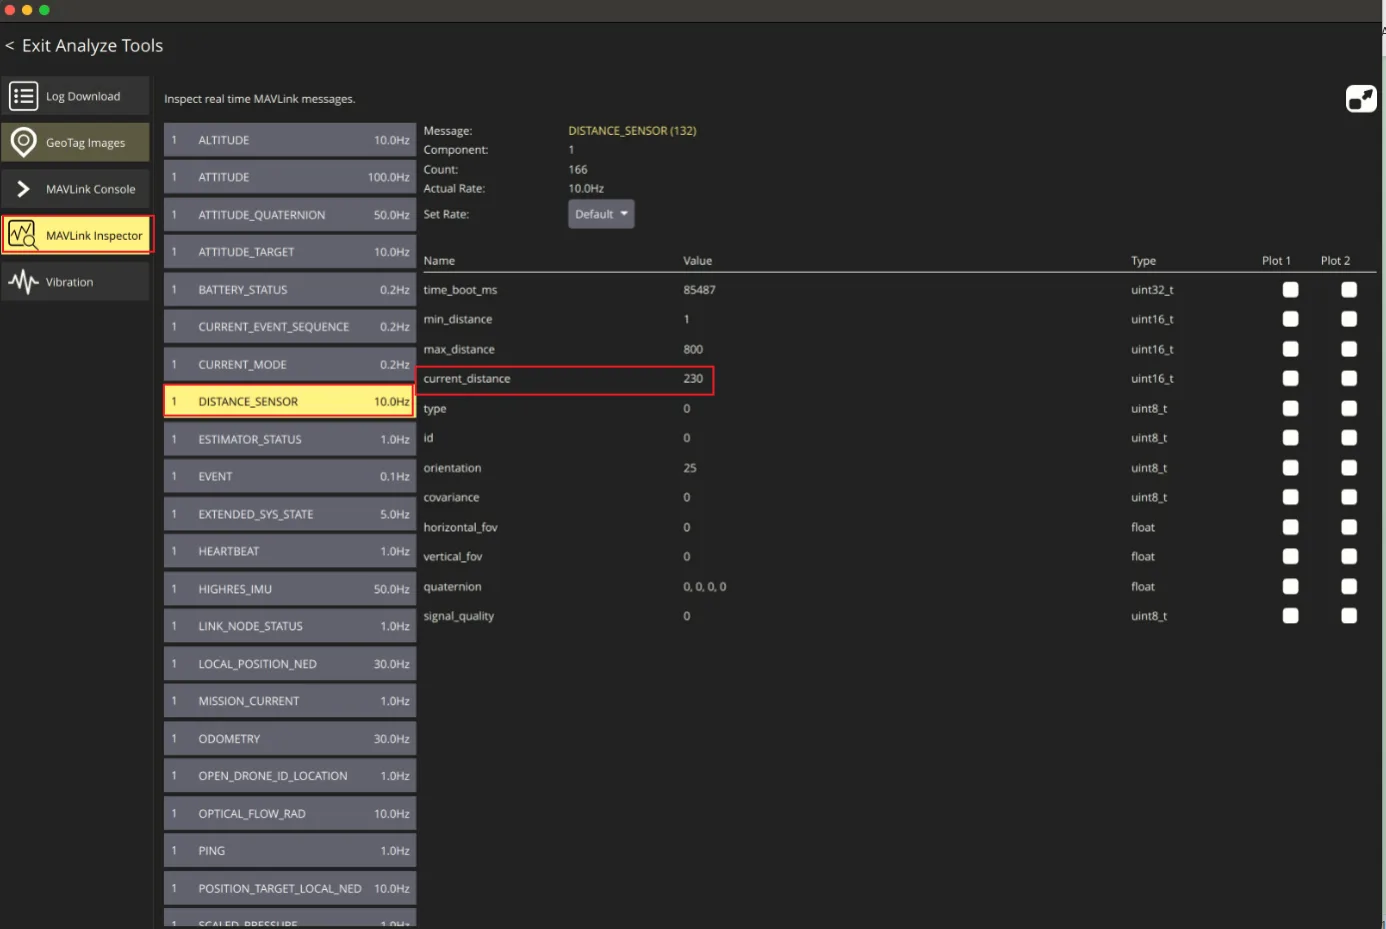
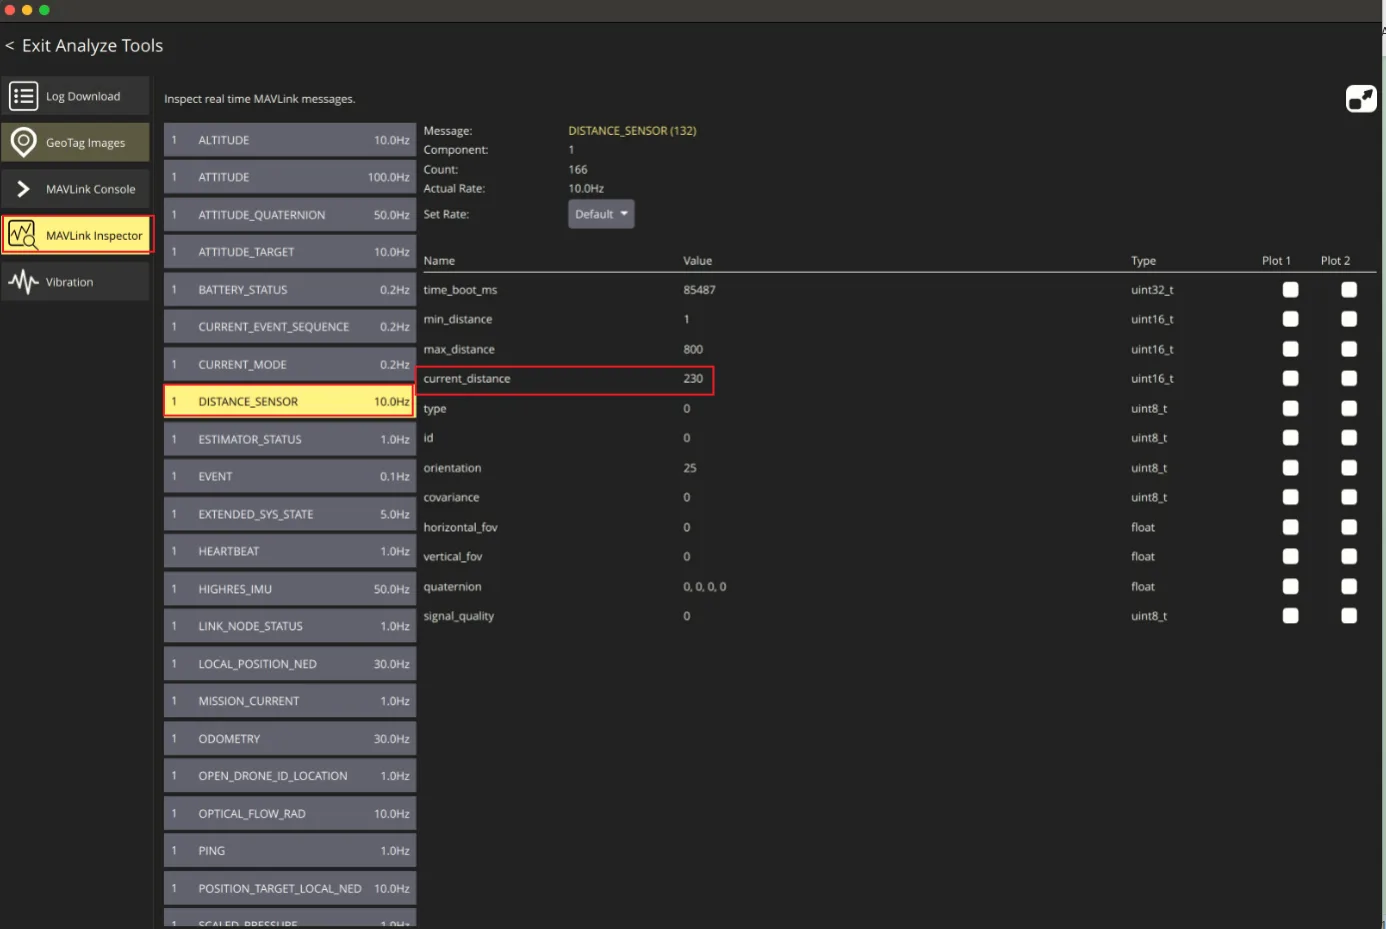
8. After the configuration is completed, restart the flight controller. You should be able to see the DISTANCE_SENSOR message in the MAVLink Inspector page of QGC, as long as there is a value. Note that the messages displayed on the QGC are sent by the flight control. The message frequency is not the same as the data frequency of the sensor. This frequency is determined by the Settings of the flight control and the speed of the data link, and is mainly used for observation. The number of the message frequency is not important.
II. APM Configuration
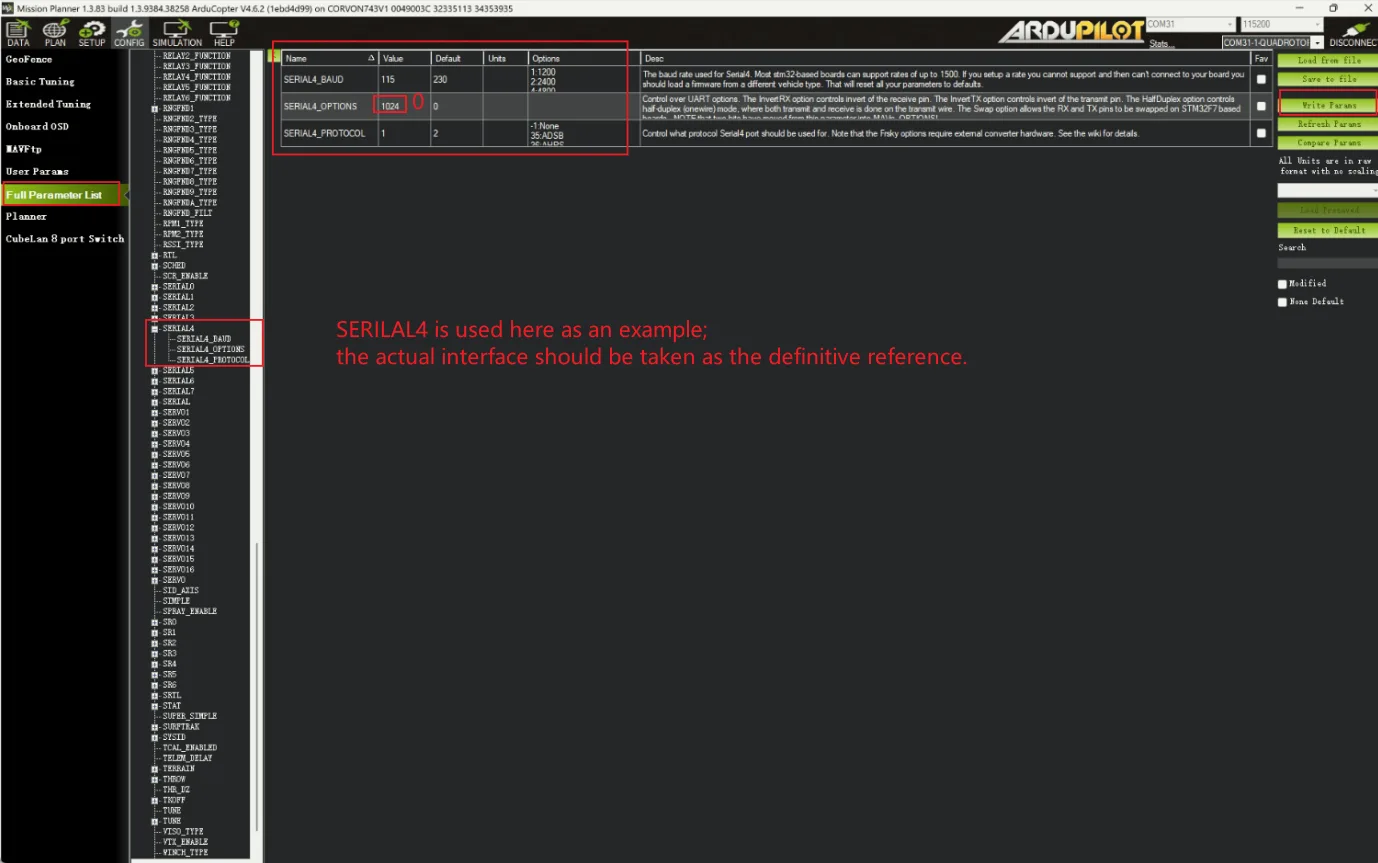
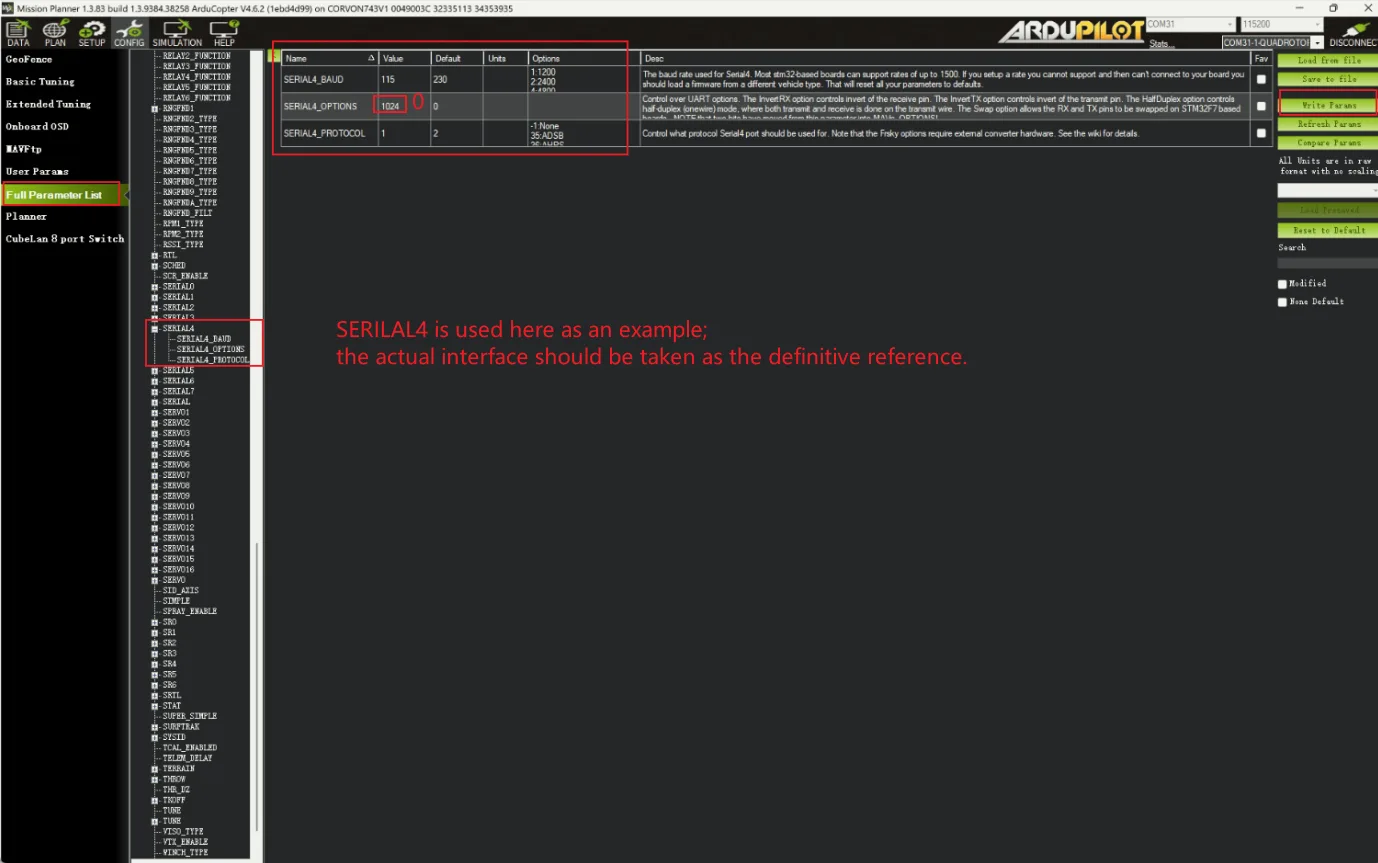
1. In Mission Planner, set the corresponding serial port baud rate SERIAL4_BAUD to 115 (115200), set SERIAL4_OPTIONS to 0, and set the serial protocol value SERIAL4_PROTOCOL to 1 (Mavlink1). Click “Write Params” to save.
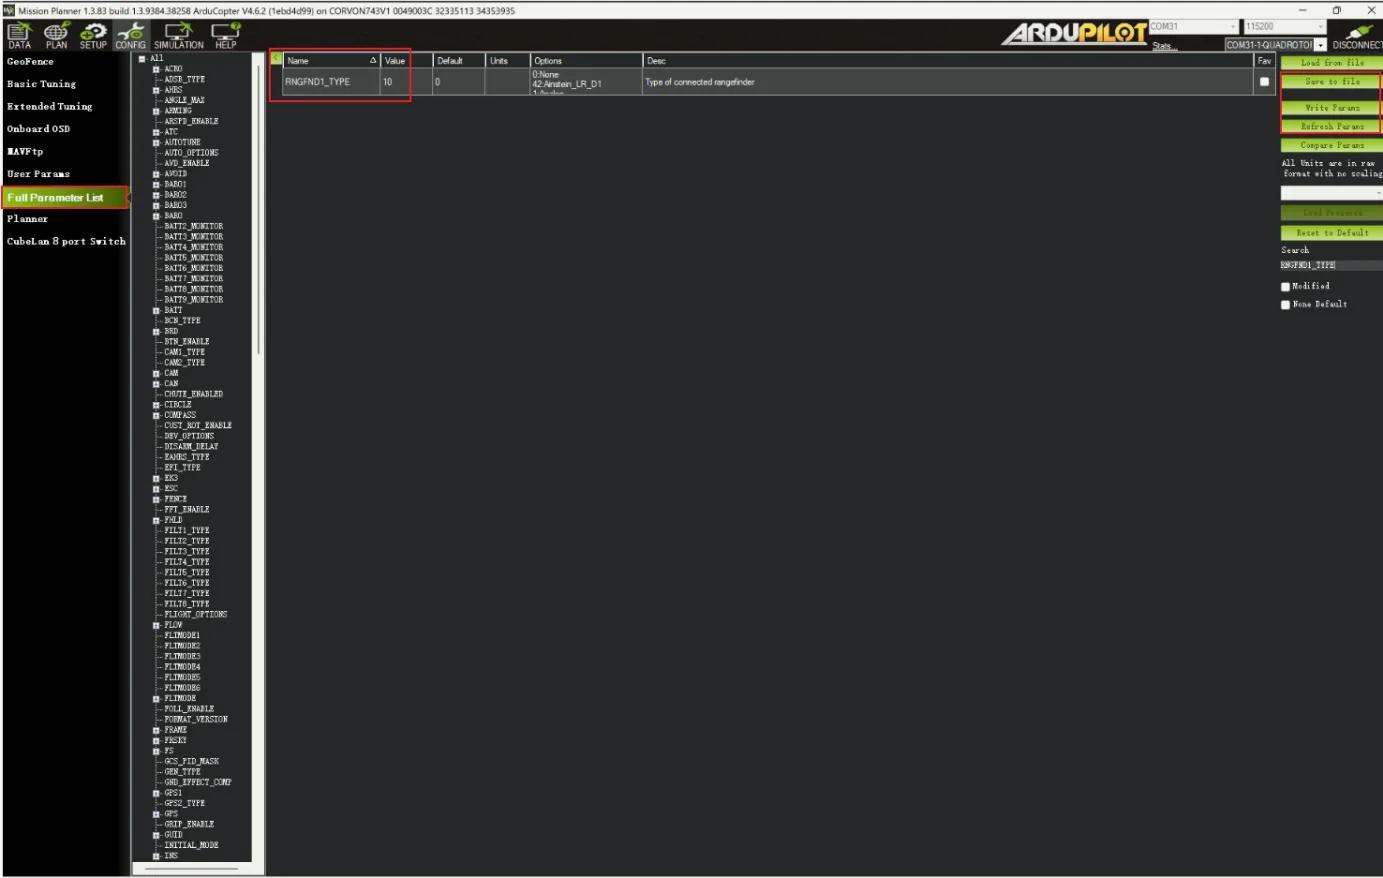
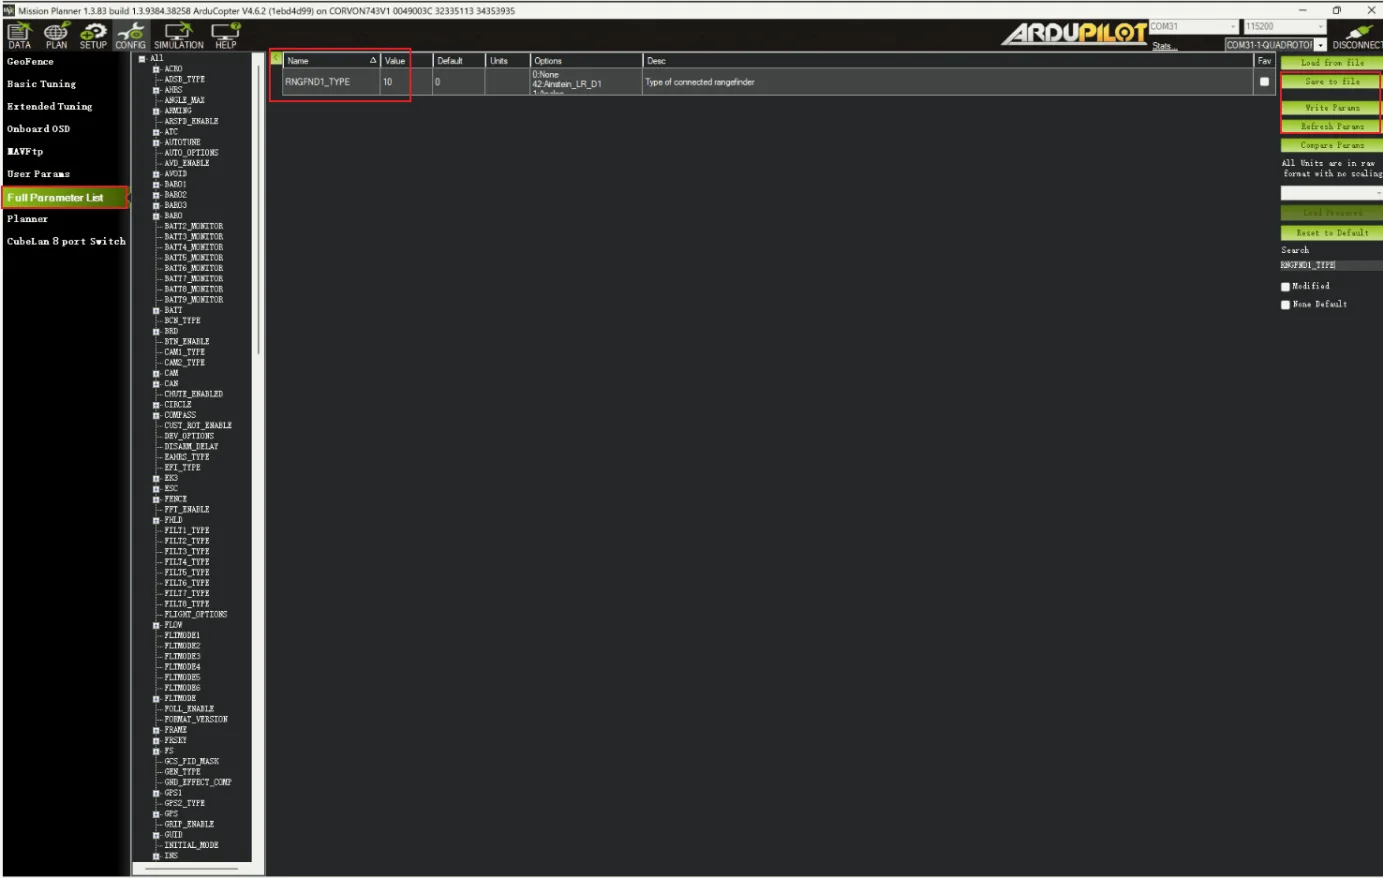
2. Set the RNGFND1_TYPE value to 10, click “Write Params” to save, then click “Refresh Params”;
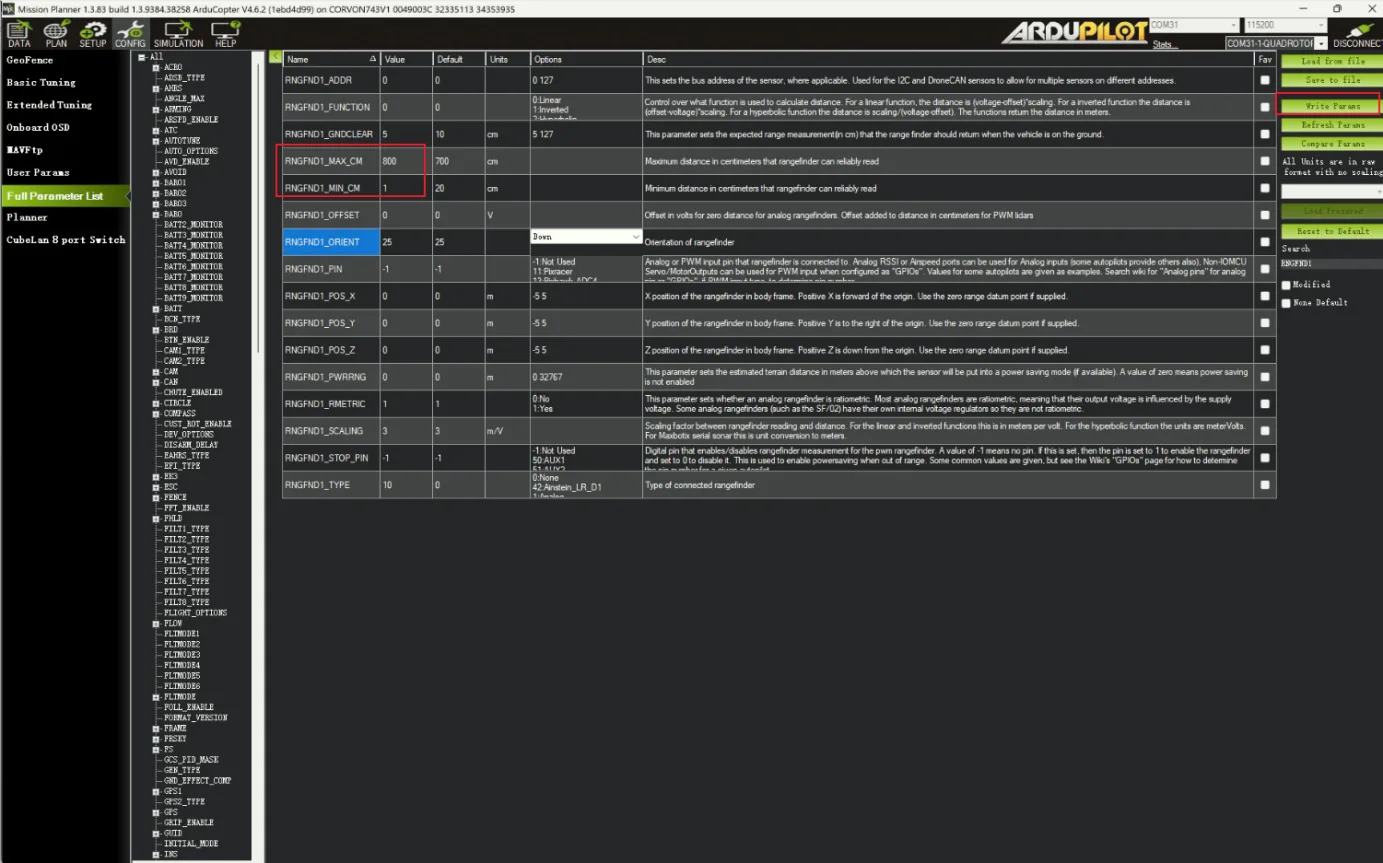
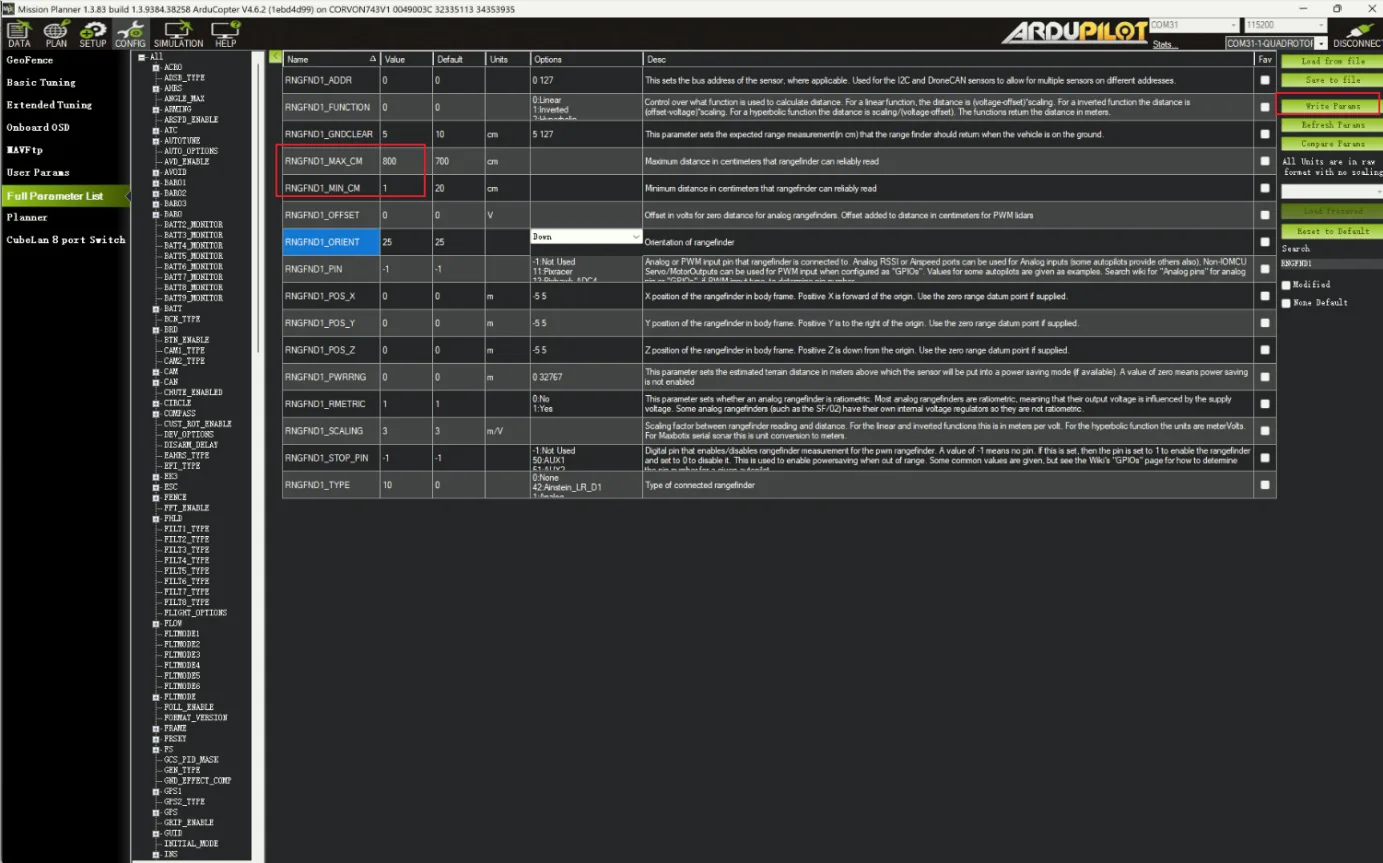
3. Set the RNGFND1_MAX_CM value to 5000 and the RNGFND1_MIN_CM value to 5.
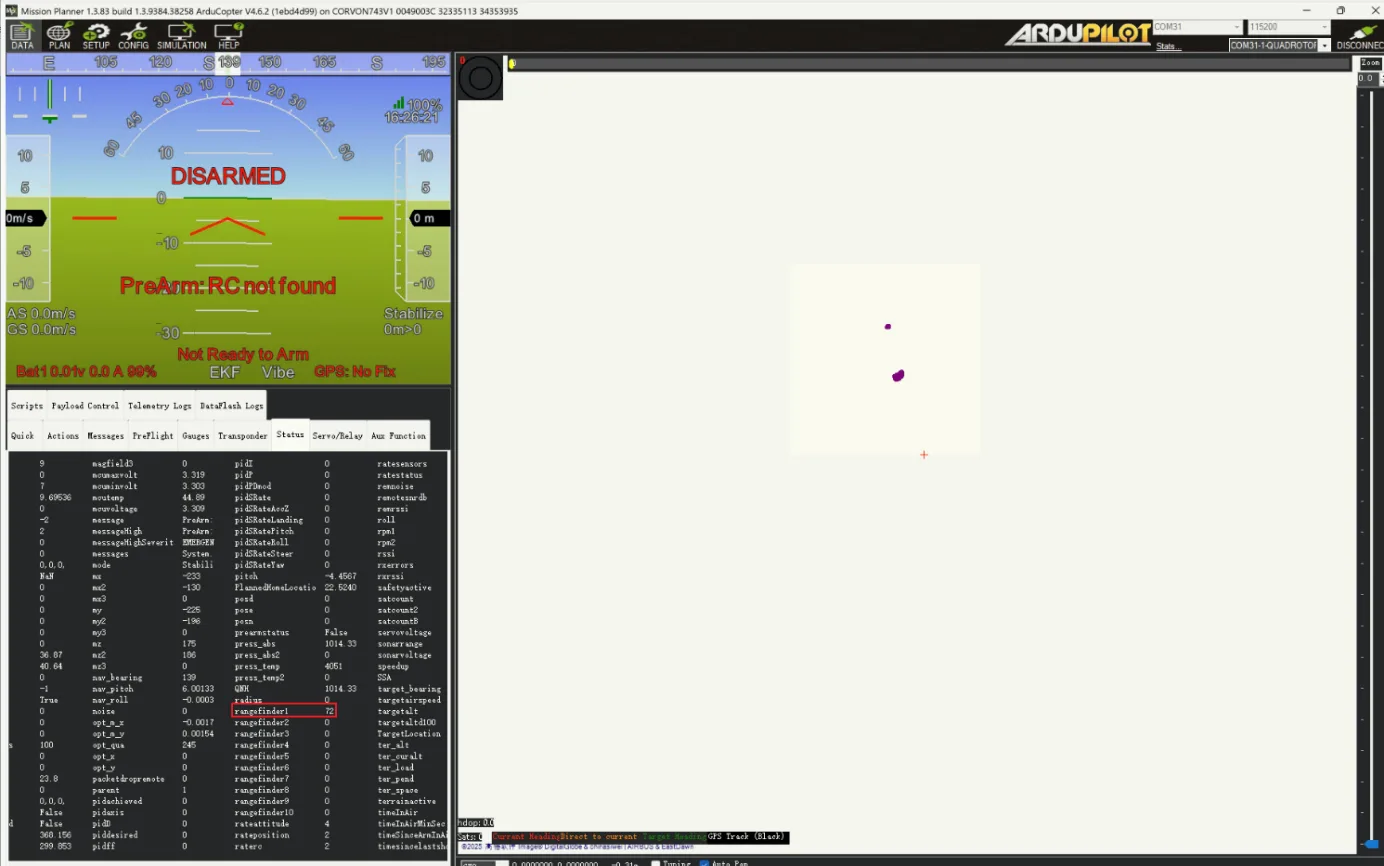
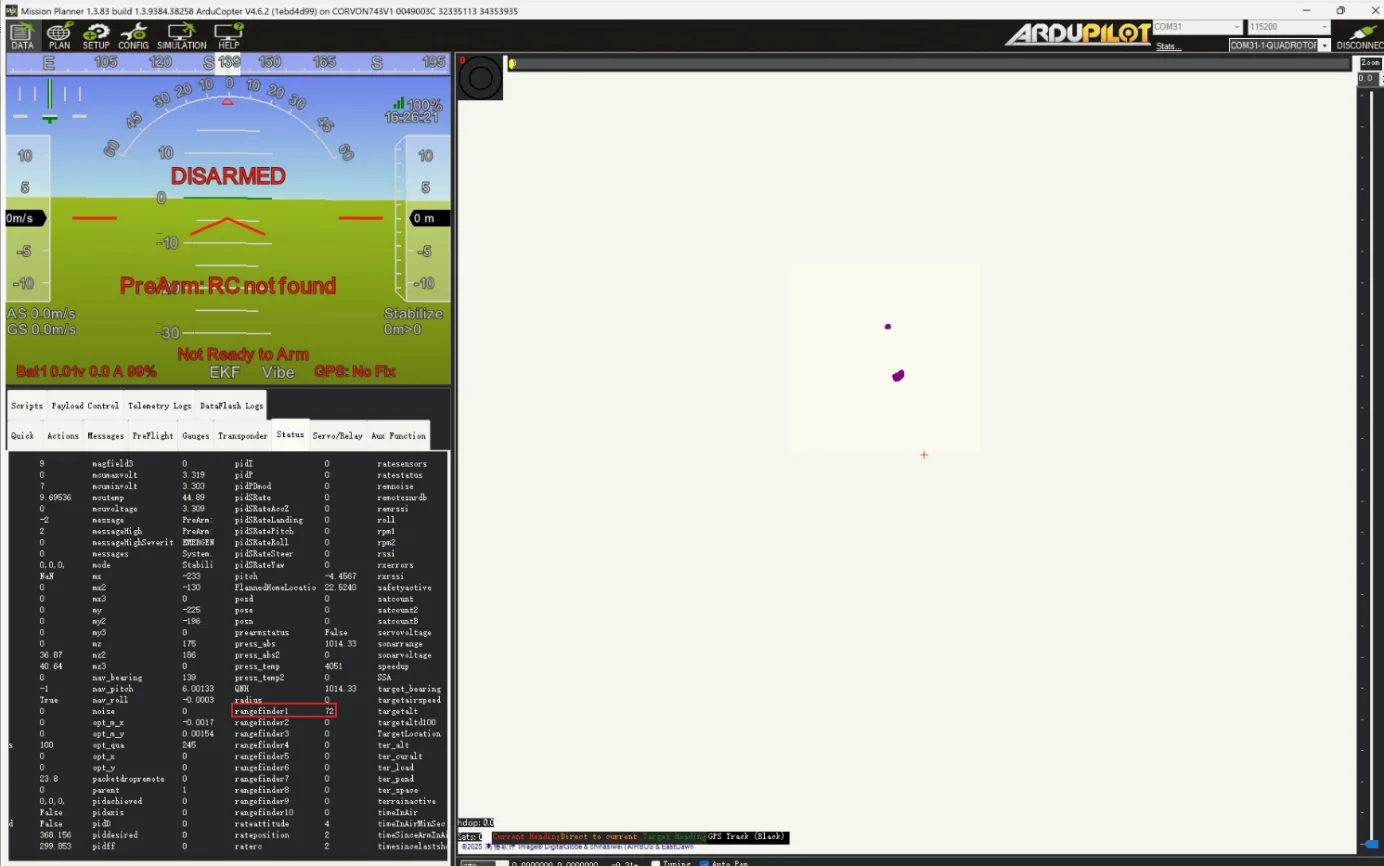
4. After configuration, you can view the values for rangefinder1 on the status page.
III. INAV Configuration
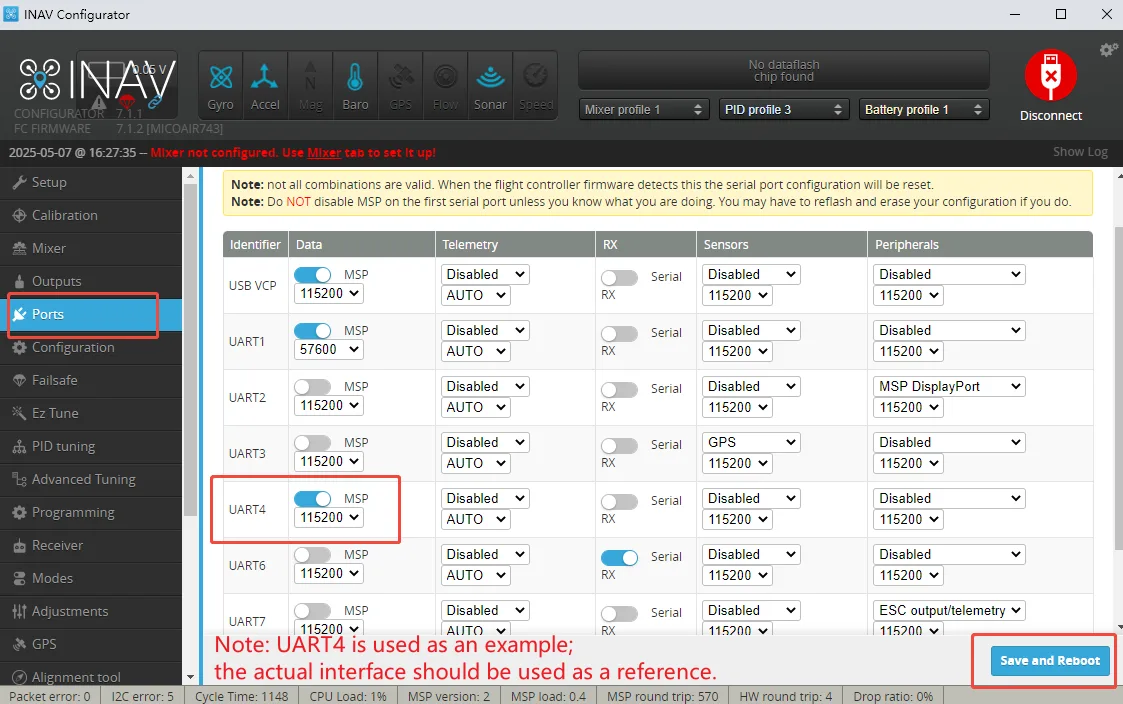
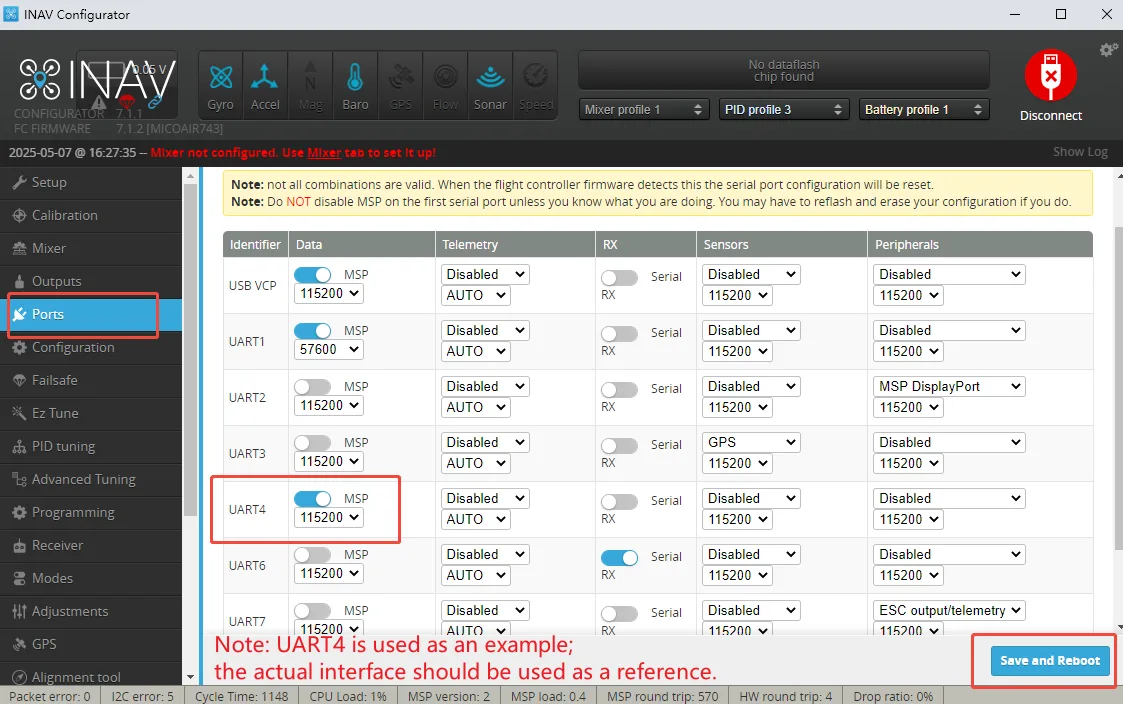
1. Open the Ports interface, enable the MSP function for the corresponding serial port (we are connected to UART4), save and restart.
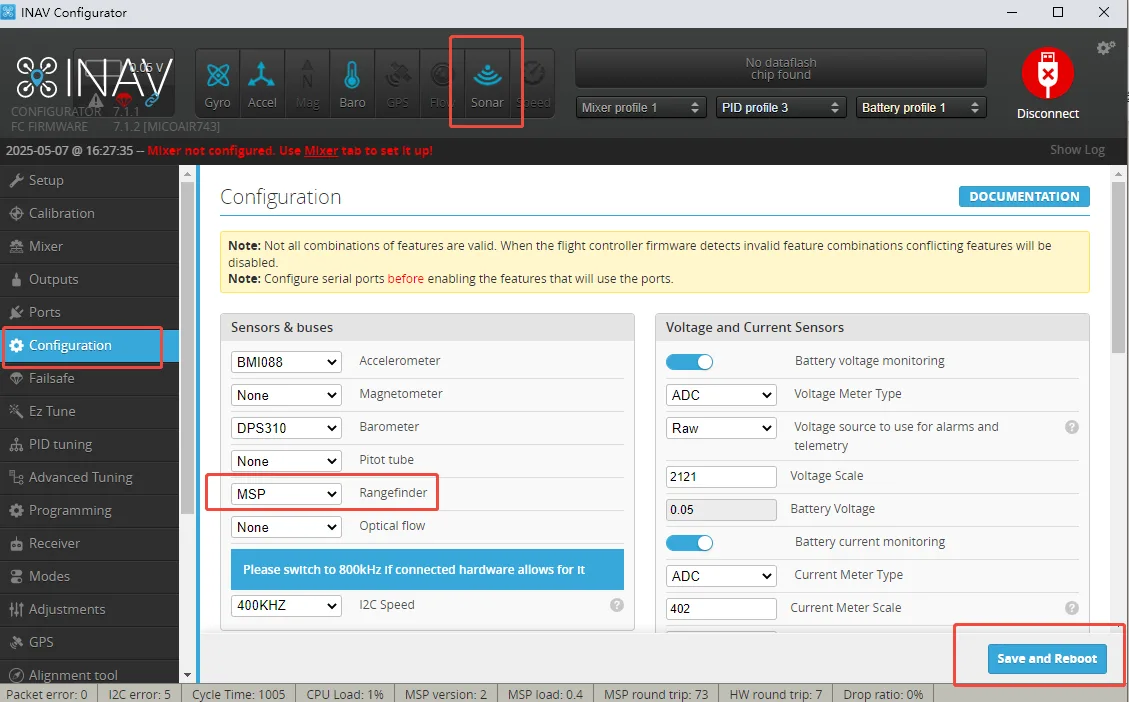
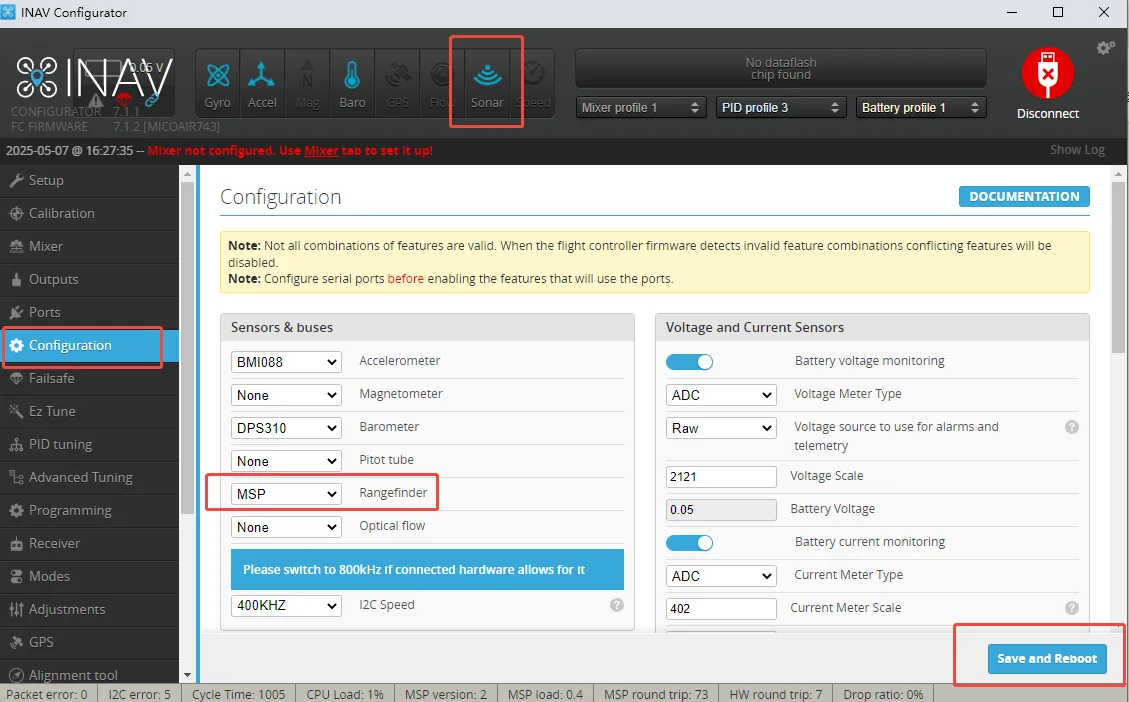
2. In the Configuration interface, set the Rangefinder option to MSP, save the settings, and restart the device. If configured correctly, the Sonar indicator light on the main interface will illuminate.
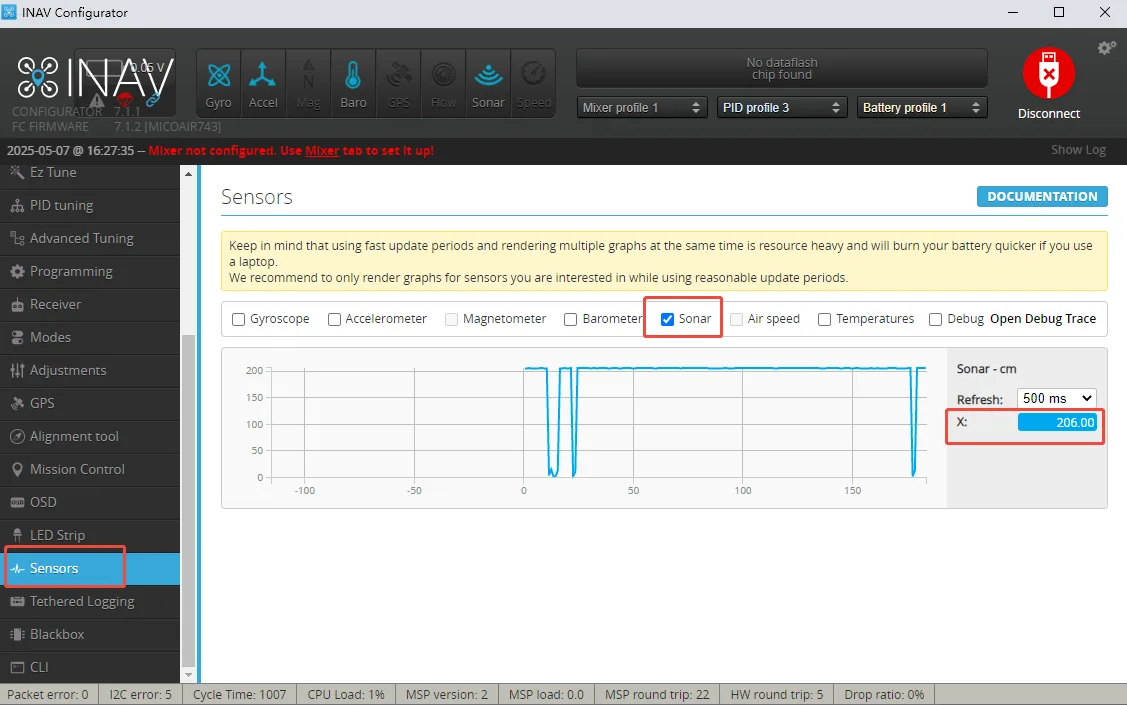
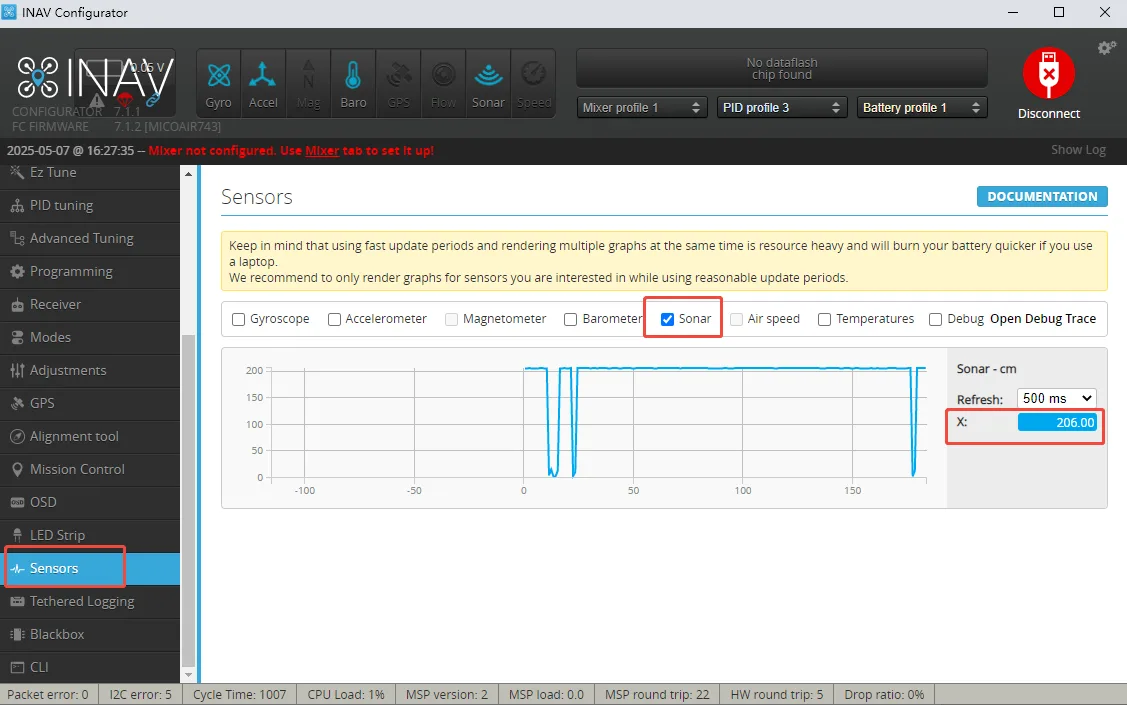
3. Check the Sonar option in the Sensors interface; if configured correctly, you should see the waveform and X-values changing.
⚠07/Safety Notice
Thank you for choosing a CORVON product. Please read this disclaimer carefully — by using this product you acknowledge and agree to the following. Because we cannot control how this product is installed, used, or maintained, we accept no liability for any loss or damage arising from its use, and any unauthorized modification is undertaken at your own risk.
Keep the optical window clean and unobstructed — dust, smudges, or a covering film will degrade ranging accuracy. Although the 905 nm source is eye-safe, do not stare into the lens at close range for extended periods. Mount the module rigidly with the lens facing the target surface, and observe correct wiring and polarity on the connector — reversed or mis-wired connections can permanently damage the module. Highly reflective, transparent, or strongly light-absorbing surfaces can affect readings; validate behavior in your environment before relying on it for flight.
CORVON
USER GUIDE · REV A · 2026-09-22
CV50 Ground Station and ToF Configuration
CV50
GROUND STATION
USER GUIDE
Remove propellers before bench setup. Use MAVLink output from the module for PX4 / ArduPilot and MSP output for INAV / Betaflight. UART4 and TELEM 2 are examples: use the port actually wired to the module. On ArduPilot 4.7+, MAVx identifies the MAVLink channel, not the SERIALx port number. Verify the channel mapping before changing options. Screenshots illustrate the UI and are not proof of flight validation; names and available features depend on the installed firmware build.
01/PX4 CONFIGURATION
PX4 Configuration
STEP 1
Open the tool and select Vehicle Configuration;
STEP 2
Set MAV_1_CONFIG to TELEM 2 and save;
STEP 3
Click “Tools” , then click “Reboot Vehicle”;
STEP 4
Set MAV_1_MODE to Normal and save;
STEP 5
Set SER_TEL2_BAUD to 115200 8N1 and save.
STEP 6
Optional height-fusion setup: leave EKF2_RNG_CTRL unchanged for the communication check in step 8. The illustrated Enabled setting enables continuous range fusion; choose it only after assessing the installed PX4 version, mounting, reliable sensor range and flight conditions. This is not a required step for receiving sensor messages.
STEP 7
Optional height reference: EKF2_HGT_REF = Range sensor is intended only for operation over a flat surface within the reliable range of a downward-facing sensor. Terrain changes move the local height reference. Keep the existing height reference for the communication check; do not copy this setting as a general flight configuration.
STEP 8
After the configuration is completed, restart the flight controller. You should be able to see the DISTANCE_SENSOR message in the MAVLink Inspector page of QGC, as long as there is a value. Note that the messages displayed on the QGC are sent by the flight control. The message frequency is not the same as the data frequency of the sensor. This frequency is determined by the Settings of the flight control and the speed of the data link, and is mainly used for observation. The number of the message frequency is not important.
02/APM CONFIGURATION
APM Configuration
STEP 1
In Mission Planner, set the corresponding serial port baud rate SERIAL4_BAUD to 115(115200), and set the options parameter according to the firmware version: for 4.7 and later, use MAVx_OPTIONS and enable bit 1 (mask 2, disable MAVLink forwarding) while preserving other bits; for 4.6 and earlier, use SERIALx_OPTIONS and enable bit 10 (mask 1024, private MAVLink channel) while preserving other bits. Then set the serial port protocol value SERIAL4_PROTOCOL to 1(Mavlink1). Click "Write Params" to save;
STEP 2
Set the RNGFND1_TYPE value to 10, click “Write Params” to save, then click “Refresh Params”;
STEP 3
Restart the flight controller after enabling the rangefinder. For ArduPilot 4.7 and later, set RNGFND1_MAX to 50 and RNGFND1_MIN to 0.05 (metres). For 4.6 and earlier, set RNGFND1_MAX_CM to 5000 and RNGFND1_MIN_CM to 5 (centimetres). Save the settings. Screenshots show the older parameter names.
STEP 4
After configuration, you can view the values for rangefinder1 on the status page.
03/INAV CONFIGURATION
INAV Configuration
STEP 1
Open the Ports interface, enable the MSP function for the corresponding serial port (we are connected to UART4), save and restart.
STEP 2
In the Configuration interface, set the Rangefinder option to MSP, save the settings, and restart the device. If configured correctly, the Sonar indicator light on the main interface will illuminate.
STEP 3
Check the Sonar option in the Sensors interface; if configured correctly, you should see the waveform and X-values changing.
04/TOF BETAFLIGHT CONFIGURATION
ToF Betaflight Configuration
The Betaflight firmware must include the rangefinder feature and the specified driver. Receiving rangefinder data does not establish altitude-hold or obstacle-avoidance capability.
The MTF01P driver example does not validate the full 50 m sensor range in Betaflight. Check the range supported by the installed driver before flight.
STEP 1
Switch ToF to MSP mode.
STEP 2
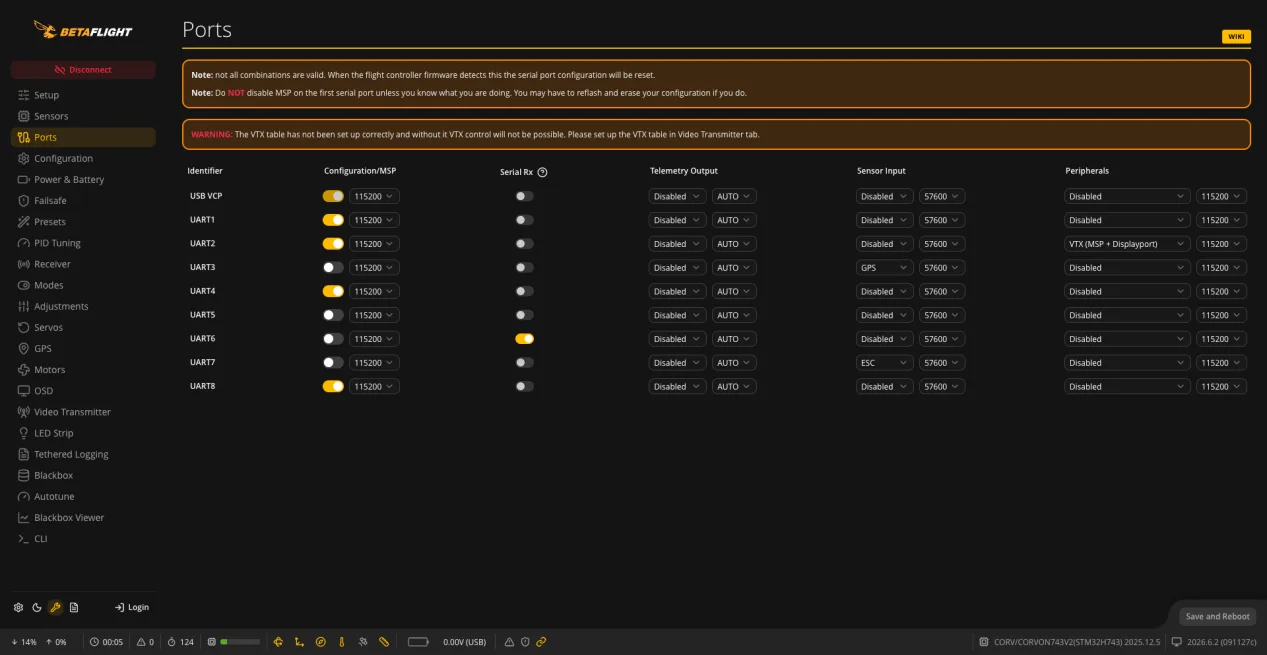
On the Ports page, enable MSP for UART4, then save and reboot.
STEP 3
Enter the following commands in CLI, one line at a time, and save:
set rangefinder_hardware = MTF01Pfeature RANGEFINDERsave
STEP 4
View rangefinder data:
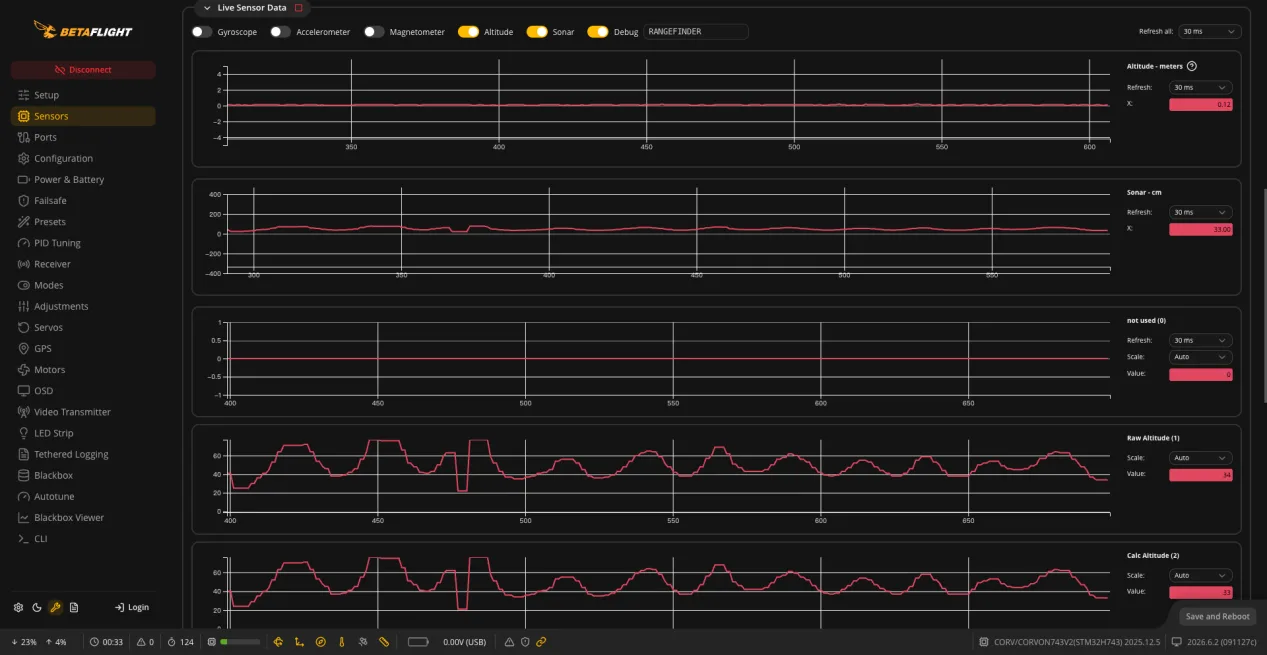
set debug_mode = RANGEFINDERsave
VIEW DATAOn the Sensors page, view Sonar - cm, Raw Altitude, and Calc Altitude.
Corvon CV50 DTOF AUTO PX4-APM-INAV Lidar Mesafe Modülü 50 MetreCorvon CV50 DTOF AUTO PX4-APM-INAV Lidar Mesafe Modülü 50 Metre en uygun fiyatla F1Depo.com'da.| Aynı gün stoktan hızlı kargo ve taksit seçenekleriyle şimdi sipariş ver!K25G2XG6FQ